Delete bad sectors. How to perform a hard drive test in Victoria and how to fix bad sectors (bad blocks) in running Windows
Q: Several bad blocks appeared on the hard. What to do? Maybe low-level formatting? How to implement it?
Q: Where can I get the program to hide the bad blocks from the screws *******? And then on the official website there is nothing!
/ from readers' letters /
A: Winchester is one of the most unreliable devices on a computer. Indeed, in addition to complex electronics, it contains continuously operating mechanical parts. Over time, they wear out, and various problems begin, the most common of which is the appearance of BAD blocks. Many users are taken aback, and they don’t know what to do next. Therefore, this article was written. In it, we will consider all available at home ways to get rid of these problems.
1. A bit of history
Bad Sectors ( from English "BAD" - bad, unsuitable) is on any hard drives. No matter how carefully their disks were made, on each of them there are several places, the recording or reading of which is accompanied by errors. In addition, there are simply buggy surface areas that can eventually develop into defects, which is unacceptable for the user. Therefore, each drive after manufacturing at the factory undergoes rigorous testing, during which bad sectors are identified. They are marked as unusable and entered in a special table - defect list .
The very first screws had a defect sheet in the form of a paper sticker, into which the addresses of unstable sections were entered at the factory. These devices, which are a slightly modified copy of a conventional floppy drive, could work only under their physical parameters: the number of tracks, sectors and heads indicated in their passport exactly coincided with their real number. By purchasing such a device, the user read the sticker and entered the addresses of the killed sites in the FAT. After that, the operating system ceased to notice these defects, just like it does not notice bad blocks on floppy disks if they were removed by scandisk. It is likely that in those days the term “bad block” appeared: the block was called cluster - The minimum unit of logical disk space. At the physical level, a cluster consists of several sectors, and if one sector is damaged, the OS declares the entire cluster unusable. No other methods for concealing defects existed at that time. And when there were ways to hide certain sectors, people did not come up with new concepts, and still continue to use the word “block” successfully.
It took quite a while before manufacturers thought of a very interesting thing: if the user still marks bad blocks as unnecessary, they reasoned, then why not mark them right at the factory? But how to do this if there is no screw file system, and it is not known what will be? That's when they came up with a tricky thing called " translator ": They began to write a special table on pancakes, which noted which sectors should be hidden from the user and which should be left to him. The translator has become a kind of intermediate link connecting the physical system of “disk-heads” with the drive interface. It was assumed that when turned on, the screw will first read its internal tables, hiding the defect addresses marked in them, and only then will allow itself BIOS, OS and application programs. And so that the user does not accidentally overwrite the translator during operation, it was placed in a special area of \u200b\u200bthe disk that is inaccessible to conventional programs. Only the screw controller could access it. This event made a real revolution in the hard drive industry, and marked the emergence of a new generation of drives - with a service area. In order for all the screws of the same model, but with a different number of defects, to have the same capacity, spare tracks were left on each of them - a reserve specially provided for leveling the capacity of the same type of drives to the standard declared value. It began to be placed at the end of the disk, near its center, and it was also inaccessible to the user. When leaving the factory, such hard drives did not have more than one visible bad sector. If new defects appeared during operation, the user could make low-level formatting a universal utility from the BIOS of the motherboard and try to hide them. Sometimes, as on floppy disks, this succeeded. But if the "evil spirits" were physical, then this did not help: adding new defects to the table and rewriting the translator without special programs was impossible. Therefore, the bad blocks on many old screws (until 1995) had to be hidden in the same, outdated way - through FAT. And only firms Seagate, Maxtor and Western Digital released utilities for hiding defects with replacing them from the reserve (they still lie on some ftp and are called sgatfmt4.exe, mformat2.exe and wddiag.exe respectively).
Time passed and the screws changed even more. In an effort to increase the recording density, the developers began to use various non-standard tricks: they began to apply to the plates servo tags designed to more accurately hit the heads on the tracks. The technology of zone-section recording (ZBR), the meaning of which was a different number of sectors on the external and internal tracks, appeared. The head drive has changed - instead of a stepper motor, a positioner in the form of a moving coil began to be used. And the heads and discs themselves have changed so much that each company has developed its own low-level format structure, sharpened only for their technology. This made it impossible to use universal low-level formatting utilities due to the fact that the translator of such screws learned to hide the physical format of drives, translating it into a virtual one. The number of cylinders, sectors, and heads written on the screw body ceased to correspond to its true values, and attempts to format such a screw with old utilities, as a rule, failed: its controller rejected the standard 50A ATA command, or simply simulated formatting, filling the screw with zeros. This has been specifically left for compatibility with older programs. For the same reason, the Low-Level Format procedure was excluded from the BIOS of modern motherboards. And in order to make such screws truly low-level formatting, it was necessary to bypass the translator, gaining direct access to physical tracks and heads. To do this, they began to use a technological utility that launches a special microcode recorded in the ROM of the drive. The call command for this microcode is unique to each screw model, and refers to technological teams that are not disclosed by the company. Often such formatting could not be done through the standard IDE interface: many screw models of the 90s - Conner, Teac, etc., as well as all modern Seagate models, require a separate connector to be connected to the terminal via the COM port. As for technological utilities, they were never widely distributed and were not available to the ordinary user. For widespread use, dope programs were written that perform pseudo-formatting through the interface: filling the disk with zeros to clear it of information. This can be seen even from the names of these utilities, which can be found on the websites of hard manufacturers: wdclear, fjerase, zerofill etc. Naturally, there are no technological teams in these programs, and therefore they can be applied to any hard drives. Such utilities are often useful in helping to get rid of certain types of BADs, which we will talk about a bit later.
Why did manufacturers act so cruelly, depriving us of the opportunity to do the correct low-level formatting, and hide defects ourselves? There is still no consensus on this question, but the official answer of most companies is something like this: “it is such a complicated and dangerous operation that you cannot allow an ordinary user to do it, otherwise many screws will simply be killed. Therefore, low-level formatting can only be done at the factory, or in a branded service center. ”
Let's try to figure out if this is really so. And at the same time, let's consider what real low-level formatting of modern hard drives is, can we do it ourselves, and most importantly - do we need it?
2. Preparing the hard drive at the factory
Before hiding bad "s in the factory, it is very important to identify everything, even very small defects, as well as unstable areas that can turn into bad" s over time. Indeed, if this happens during operation, the user may lose an important file, and the reputation of the company that released such an “unfinished" drive will be damaged. Therefore, testing hard drives before hiding defects takes a very long time, at least several hours, and is performed in technological mode. This is done to exclude temporary sx delays that inevitably occur during the operation of the translator, sending data through the cache and interface logic. Therefore, at the factory, the surface is scanned only by physical parameters. Usually this is not done by an external program, but by a special module in the ROM of the screw that works without the participation of an interface. The end result of such testing is getting a defect list - an electronic list of unusable areas of disk space. It is entered into the service area of \u200b\u200bthe screw and stored there for the entire life of the drive.
Modern hard drives have two main defect lists: one is filled at the factory in the manufacture of the drive and is called the P-list (“Primary” - primary), and the second is called the G-list (from the word “Grown” - growing), and is replenished during operation screw, when new defects appear. In addition, some screws (in particular, Quantum Fireball of the ST and TM series) also have a servo-defect sheet (servo marks applied to winchester plates also sometimes have errors), and many modern models also contain a list of temporary (pending) defects. In it, the controller enters sectors that are “suspicious” from its point of view, for example, those that were not read the first time, or with errors.
After receiving the defect list, proceed to hide the defects. There are several ways to hide them, each of which has its own characteristics. Theoretically, you can simply reassign the addresses of the damaged sectors to the reserve and take them from there, but this will cause a screw performance loss, since each time it detects a sector marked as unusable, it will be forced to move the heads to a reserve area, which can be far from the defect. If there will be a lot of reassigned sectors - the performance of the drive will drop very much, since most of the time it will be spent on useless jerking of the heads. Moreover, the speed of screws with a different number of defects will vary greatly, which of course is unacceptable in mass production. This method of hiding defects was called " substitution method " or remap (from the English “re-map”: restructuring the sector map).
Due to the many drawbacks inherent in remap, in industrial production of screws this method never they don’t apply, but use a different algorithm: after identifying all the defects, the addresses of all serviceable sectors are rewritten again so that their numbers go in order. Bad sectors are simply ignored and are not involved in further work. The reserve area also remains continuous and part of it joins the end of the work area - to equalize the volume. This method of hiding badges is more difficult to implement than a remap, but the result is worth the effort expended on it - for any number of bad sectors, the drive does not slow down. This, the second main type of concealment of defects was called " sector skipping method ". (There are other algorithms for factory concealment of defects, for example, by eliminating the whole track, or using the spare sector on each track, but they have drawbacks and therefore are practically not used in modern drives).
The process of address translation with the omission of defects is called "internal formatting". Internal - because the whole process takes place completely inside the screw, at physical addresses and without the participation of an interface. At this time, the screw is under control of the firmware integrated in its ROM, which analyzes the defect list and controls the formatting. External commands cannot interrupt it. Upon completion of formatting, the firmware automatically recounts the translator (or creates it again), and the screw becomes ready for use. After that, he, without a single bad block, arrives from the factory to the buyer.
3. New technologies
Now it’s clear why proprietary utilities do not perform any operations related to direct access to the service area. After all, hiding defects by formatting is an almost complete repair cycle, based on external parameters and associated with a clear understanding of each step. And enough to do something wrong to ditch the drive. We give a simple example: the user decided to make a “real” low-level formatting by starting the ROM subroutine in technological mode. The process usually lasts 10-60 minutes, but then there is a power failure or a banal hang - and the screw remains without a translator, because just does not have time to recreate it. This means that such a device will be unsuitable for further work - it will simply not be seen by either the OS or the BIOS. It’s even scary to imagine how many drives can be killed this way, out of simple curiosity or by mistake. Especially if these utilities fall into the hands of dummies, launching everything on their computers and pressing RESET instead of "any key". Of course, the disk does not deteriorate irrevocably, and by restarting the formatting you can bring it back to life. But the thinking of most users is designed in such a way that when faced with problems (a corpse not defined in the BIOS instead of a screw), many panic, blaming the manufacturers for everything. And they do not need extra hemorrhoids, of course - it is much more important to make the screw work out the warranty period. Therefore, several years ago, they began to lay the possibility of “repairing” bad sections on their own drives — doing a remap. As mentioned earlier, the remap did not find application in the factory preparation of drives, but it turned out to be a very successful solution for hiding defects in domestic conditions. The advantages of remapping over internal formatting are the lack of transferring the screw to technological mode, speed of operation and safety for the drive. In addition, in many cases, a remap can be done without demolition of the file system, and without the associated destruction of data. This technology is called automatic defect reassignment (automatic reassignment of defects), and the process itself is reassign. Thus remap and reassign - this is basically the same thing, although the term reassign is usually applied to a single sector, and remap to the entire disk.
The remap works as follows: if an error occurs while trying to access the sector, the “smart” controller understands that this sector is faulty and marks it on the fly as BAD. His address is immediately entered in the defects table (G-list). For many screws, this happens so quickly that the user does not even notice the detection of a defect and its concealment. During operation, the screw constantly compares the current sector addresses with the addresses from the table and does not access the defective sectors. Instead, it moves the heads to the backup area and reads the sector from there. Unfortunately, due to the time spent on long positioning, such sectors will look like small dips in the reading chart. The same thing will happen when recording. Therefore, Quantum engineers went even further and almost eliminated the main drawback of the remap, embodying their ideas in many models of the Fireball series: these drives have one spare sector on each track, the remap occurs in this sector, and there are practically no delays.
If an error occurs during normal operation of the OS, automatic remap is extremely rare. This is due to the fact that, on most hards, reassign only works when recording. And many operating systems check the sector for integrity before writing, and when it detects an error, it refuses to write to it. Therefore, in most cases, to perform a remap, the screw needs to be “asked” to do this - to force a low-level rewrite of the sector, bypassing the standard OS and BIOS functions. This is done by a program that can access the screw directly through the ports of the IDE controller. If an error occurs during such a recording, the controller will automatically replace this sector from the reserve, and the BAD will disappear.
The work of most utilities of the so-called "low-level formatting" from manufacturers is based on this principle. All of them, if desired, can be used for screws of other companies (if such programs refuse to work with other people's hard drives - this is done for marketing reasons. For example, Fujitsu suffers from such greed). And of course, remap functions are present in many universal and free programs, the features of which we will consider a little later. In the meantime, some more theory :)
The most common myth among users is the assertion that each screw needs its own, “special” program to hide defects, as well as the fact that remap is a low-level formatting. This is actually not the case. Remap is just a form of recording information using standard tools, and in most cases, any remap utilities can be applied to any screws. Remaps are not done by external programs, but by the screw controller. Only he decides to reassign defective sectors. “Alien” programs cannot spoil the drive either, since technological commands are not used in them, and in normal mode, the screw will never allow you to do anything with you except standard read-write operations. The only difference between proprietary utilities is the number of write / read / verification attempts for different screws. In order for the controller to "believe" that there is a BAD to be hidden in the sector, some hards need only one cycle, and others - several.
4. Again about S.M.A.R.T.
Almost all hard drives released after the 95th year have a system of operational monitoring of their condition - S.M.A.R.T. (Self Monitoring And Reporting Technology). This technology allows you to evaluate at any time such important parameters of the drive as the number of hours worked, the number of errors that occurred during reading / writing, and much more. The first hard drives equipped with this system (for example WD AC21200) had a very imperfect SMART of four to six attributes. But soon the SMART-II standard was developed, and from the moment it appeared in most drives, such a feature as internal diagnostics and self-monitoring appeared. This function is based on a series of stand-alone internal tests that can be run with standard ATA commands and is intended for in-depth monitoring of the state of drive mechanics, disk surfaces and many other parameters. After performing the tests, the drive without fail updates the readings in all SMART attributes in accordance with its current state. Testing time can vary from a few seconds (Quantum) to 54 minutes (Fujitsu MPG). You can activate SMART tests, for example, with the MHDD program: maysoft.com.ua/files/mhdd/mhdd2743.zip (console command "smart test"). After starting the tests, “strange” phenomena are possible, very similar to those that occur during the operation of the defragmenter: continuous burning of the HDD indicator and the sound of intense movement of the heads. This is normal: a screw scans the surface for defects. You just need to wait a while until the self-test ends and the screw calms down.
More recently, the SMART-III specification has appeared, in which there is not only the function of detecting surface defects, but also the possibility of restoring them on the fly and many other innovations. One of its varieties was the system Data lifeguard used in new Western Digital drives. Its essence is as follows: if no calls are made to the screw, it starts to scan the surface on its own, revealing unstable sectors, and when it is detected, transfers data to the backup area. After which he makes a reassign. Thus, the data is saved even before a real BAD appears on this site. Unlike SMART monitoring, Data Lifeguard cannot be disabled by external commands and works continuously. Therefore, the "visible" BAD-blocks on modern Western Digital hard drives almost never appear.
To view the smart status of the hard drive, programs called smart monitors are used. One of them is part of the HddUtil complex for DOS and is called smartudm. You can download it here: www.sysinfolab.com/files/smartudm.zip. This program works with any hard drives and controllers. In addition, complete with this program is a detailed documentation with a description of all the attributes. There are SMART monitors for Windows 9x, for example, SiGuardian (www.siguardian.ru) and SmartVision (www.acelab.ru/products/pc/utility.smart203.zip) are very popular, but they may not work on some systems. This is explained by the fact that the programs work with the screw directly, through the ports, and the bus mastering drivers of some chipsets prevent this. Windows XP owners should pay attention to the SmartWiew monitor www.upsystems.com.ua/support/alexmina/click.php?url\u003dSmartView.zip - the program works correctly in this system even on VIA chipsets.
There is some relationship between SMART attributes and surface state. Consider those that are directly related to bad blocks:
Reallocated sector count and Reallocated event count : number of reassigned sectors. These attributes show the number of sectors reassigned to the remap in the Grown defect list. For new screws, they must be equal to zero! If their value differs from zero, then this means that the screw was already in use, bads appeared on it, and a remap was made to it. And with Fujitsu screws, these attributes can spontaneously increase due to poor-quality power. Be careful when buying used!
Raw read error rate : number of read errors. Many hards (for example, Seagate and Fujitsu) are always above zero, but if the Value is within the normal range (green zone), there is nothing to fear. These are “soft” errors, successfully corrected by the drive electronics and not leading to data distortion. It is dangerous when this parameter drops sharply in a short time, turning into the yellow zone. This indicates serious problems in the drive, the possible appearance of bads in the near future, and that it is time to backup important data.
Current Pending Sector : this attribute reflects the contents of the “temporary” defect list present on all modern drives, i.e. current number of unstable sectors. The screw could not read these sectors the first time. The raw value field of this attribute shows the total number of sectors that the drive currently considers remap candidates. If in the future one of these sectors is read (or rewritten) successfully, then it will be excluded from the list of applicants. A constant value of this attribute above zero indicates a malfunction in the drive.
Uncorrectable Sector : shows the number of sectors in which errors could not be corrected with an ECC code. If its value is above zero, it means that it is time for the screw to remap: it is possible that during data recording the OS will run into this sector and as a result some important info or system file will be corrupted. However, for some screws, for example, for Fujitsu MPG, for some reason this attribute is not reset after the remap, therefore it is not necessary to trust its readings.
5. Types of defects and the reasons for their appearance
The time has come to figure it out, and why, in fact, there is such a nuisance as bads? In UPGRADE # 49, we examined only the external causes that contribute to their occurrence. And now it's time to look at the problem from a different perspective - from the side of the hard drive itself. To do this, consider the structure of the sector, as it is seen by the electronics of the screw "from the inside":
Fig. 1. Simplified hard disk sector structure.
As can be seen from Figure 1, everything is much more complicated than it might seem at first glance, even with the help of a disk editor. A sector consists of an identifier header and a data area. The beginning of the sector is marked with a special byte - an address marker (1). It serves to inform the controller that the sector is under the head. Then there are cells that contain a unique sector address in the CHS format (2) and its checksum to verify the integrity of the recorded address (3). 512 bytes of user data are placed in a separate field (4), to which several tens of bytes of redundant information are added when writing, intended to correct reading errors using an ECC code (5). Next to the data is placed 4 bytes of a cyclic data checksum (CRC), which serves to verify the integrity of user data, and messages to the error correction system when it is violated (6). For more reliable operation of the sector during rotation speed fluctuations, there are byte-spaces (7). Some winchesters have an additional byte after AM - in it the sector is marked as BAD.
As long as the format structure is not broken, the hard drive is working properly, clearly fulfilling its duties - storing information. But it is worth interfering with evil forces - and depending on the type of destruction, they appear as BAD's of varying severity.
Defects can be divided into two large groups: physical and logical. Consider each of them in detail.
Physical defects
Surface defects . They occur during mechanical damage to the magnetic coating inside the sector space, for example, due to scratches caused by dust, aging pancakes or careless handling of the screw. Such a sector should be marked as unusable and excluded from circulation.
Servo errors. All modern drives use a system called “voice coil” (voice coil) to move the heads, which, unlike the stepper motor of old screws, does not have any movement discreteness. For accurate hit heads on the tracks in the screws, a feedback system is used, which are guided by special magnetic servo tags applied to disk. Servo tags are available on each side of each drive. They are located evenly along all tracks, and strictly radially, like spokes in a wheel, forming servo format . It does not belong to the lower level format and is not shown in the figure, but it is present in absolutely all modern hard drives, and plays a crucial role. According to servo marks, the engine speed is stabilized and the head is held on a given track, regardless of external influences and thermal deformation of the elements.
However, during operation of the screw, some servo tags may be destroyed. If there are too many dead servo tags, at this point failures will occur when accessing the information track: the head, instead of occupying the position it needs and reading the data, will begin to shy from side to side. It will look like a bold and especially arrogant BAD, or even a group of BAD’s. Their presence is often accompanied by a knock of heads, freezing of the drive and the inability to fix it with ordinary utilities. The elimination of such defects is possible only with special programs, by disabling defective tracks, and sometimes the entire disk surface. For these purposes, some drives have a servo-defect list that stores information about bad servo-tags. Unlike the P- and G-list, the servo-defect list is used not by the translator, but by the entire firmware The screw sectors are blocked even by physical parameters, which avoids knocks and breakdowns when accessing them. The screw cannot restore the servo format by itself, it is done only at the factory.
Hardware Bad's . Occur due to malfunction of the mechanics or electronics of the drive. Such problems include: breakage of heads, displacement of disks or a bent shaft as a result of an impact, dusting of a pressure zone, as well as various glitches in the operation of electronics. Errors of this type are usually catastrophic and cannot be corrected programmatically.
Logical defects
These errors occur not because of surface damage, but because of violations of the logic of the sector. They can be divided into correctable and incorrigible. Logical defects have the same external manifestations as physical ones, and they can be distinguished only indirectly, according to the results of various tests.
Correctable logical defects (soft-bads) : appear if the sector checksum does not match the checksum of the data written to it. For example, due to interference or power failure during recording, when the screw has already written data to the sector, but did not manage to record the checksum (Fig. 1). The subsequent reading of such an “unfinished” sector will fail: the screw will first read the data field, then calculate its checksum and compare it with the recorded one. If they do not match, the drive controller will decide that an error has occurred and will make several attempts to re-read the sector. If this does not help (but it does not help, since the checksum is obviously wrong), then he will use the code redundancy to try to correct the error, and if this fails, the screw will give an error to the external device. On the part of the operating system, it will look like a BAD. Some screws had an increased tendency to form soft bads due to errors in the firmware — under certain conditions, checksums were not calculated correctly; in others, this was due to defects in the mechanics. For example, at IBM DTLA, the contact between the board and the Hermoblock was periodically broken, which led to the loss of power to the Hermoblock at the most inopportune time, including during recording.
The operating system or BIOS cannot fix a logical defect on their own, because before they write to the sector, they check it for integrity, run into an error and refuse to write. At the same time, the screw controller cannot correct this error either: it tries in vain to read this sector from the second, from the third attempt, and when this does not work out, it does its best to help itself, adjusting the reading channel and servo system on the go. At the same time, the very heart-rending rattle is heard, so familiar to the owners of the poor "woodpeckers". This creak is not produced by “heads on the surface”, as many people are accustomed to think of, but just a positioner coil, due to the specific shape of the current flowing through it, and it is absolutely safe. The address of the unread sector falls into the temporary defect list, changing the value of the Current Pending Sector attribute in SMART, and is stored in it. Remap when reading does not occur.
And only forced low-level rewriting of this sector with a special program bypassing the BIOS leads to automatic recalculation and rewriting of the checksum, i.e. the bad disappears without a trace. You can rewrite it with a disk editor that can work with the screw directly through the ports, but they usually “rewrite” the entire disk, filling its sectors with zeros. Utilities that do this are freely distributed by hard manufacturers, and are often incorrectly called "low-level formatting programs." In fact, these are simple “nullifiers”, which doesn’t stop them from getting rid of the bad screw at all: with a successful recording, the soft bad disappears, and with a bad record, the bad is considered physical, and auto-repair occurs.
Fatal logical errors . These are errors of the internal format of the hard drive, leading to the same effect as surface defects. They occur during the destruction of sector headers, for example, due to the action of a strong magnetic field on the screw. But unlike physical defects, they can be corrected programmatically. And they are called incorrigible only because to correct them, it is necessary to make the “correct” low-level formatting, which is difficult for ordinary users due to the lack of specialized utilities. Therefore, in everyday life such a sector is disabled in the same way as the physical one - with the help of a remap. Currently, an increasing number of screws are manufactured using ID-less technology (sectors without headers), so soon this type of error will become irrelevant.
Adaptive Badges . Despite the fact that the screws are very accurate devices, their mass production inevitably leads to a scatter in the parameters of mechanics, radio components, magnetic coatings and heads. This did not bother the old drives, but for modern screws with their enormous recording density, the slightest deviations in the sizes of parts or in the amplitudes of the signals can lead to a deterioration of the product’s properties, the appearance of errors, up to the complete loss of its operability. Therefore, all modern screws in the manufacture are individually tuned, during which such parameters of electrical signals are selected that make the device work better. This setting is performed by the ROM program during technological scanning of the surface. In this case, so-called adaptive - variables that contain information about the features of a particular pressurized unit. Adaptives are stored on pancakes in the service area, and sometimes in Flash-memory on the controller board.
If during the operation of the screw the adaptives are destroyed (this can happen as a result of errors in the screw itself, static electricity, or due to poor-quality power supply), the consequences can be unpredictable: from a banal pile of bads to the complete inoperability of the device, with a refusal to go on readiness for to the interface. Adaptive\u003e bads differ from ordinary ones in that they are "floating": today they are, and tomorrow they can disappear and appear in a completely different place. Remapping such a screw is useless - ghost defects will appear again and again. And while the disk surface can be in perfect condition! Adaptive badges are treated with the selfscan run, an internal testing program similar to that used at the factory for the manufacture of screws. In this case, new adaptations are created and the screw returns to its normal state. This is done in the conditions of branded service centers.
Emerging defects
These are parts of the surface on which a pronounced defect has not yet formed, but problems with read speed are already noticeable. This is due to the fact that the sector is not read by the controller the first time, and the screw is forced to make several turns of the disk, trying to read it without errors. If you can still read the data, the screw will not report anything operating system, and the error will go unnoticed until a real BAD block appears at this place. As a rule, it immediately becomes clear that it was at this point that a very important file was stored, in a single copy, and it was no longer possible to save it. Therefore, disks need to be tested periodically. This can be done with Scandisk or Norton Disk Doctor in surface testing mode, but better with a special utility that works independently of the file system and can detect emerging BADs by measuring the reading time of each sector.
All rights to this material belong to Sergei Kazanskij (onehalf), 2002.
In preparing the chapter on S.M.A.R.T, an article by Mikhail Mavritsyn was used.
Material taken from the site:
Hi admin! Tell me how to trim the hard drive from bad sectors?
My hard drive is terribly slow, reinstalling the operating system did not solve anything. According to your advice, Victoria checked the hard drive with the program and she found a lot of sectors with unsatisfactory reading latency of 600 ms (candidates for bad blocks) - 153, also full-fledged bad blocks (bad sectors) -11 were found. The parameter - Reallocated Sector Count - (remap), denoting the number of reassigned bad sectors, spare sectors from the backup tracks - lights up red, as I understand it, there is nothing to reassign bad sectors.
I read on the Internet that somehow it is possible to get a piece of a hard disk with bad sectors out of work. How can this be done?
Hello friends! You can trim a section of a hard disk with bad sectors anywhere in the drive: at the beginning, in the middle or at the end, the most important thing is that bad sectors are not scattered throughout the hard drive, in which case it is better to simply replace the problematic HDD. But often the bad blocks are not scattered throughout the drive, but are grouped in one place, then you just need to take the Acronis Disk Director program or the free AOMEI Partition Assistant Standard Edition and create unallocated space in place of the bad blocks, details in the article later.
Just a week ago, I again got a hard drive from the very first articles about and I decided on it to show you how to trim the “bad” part on the HDD.
We take our old friend - the WD5000AAKS hard drive (500 GB capacity). After our treatment, he worked for a year and the owner of the HDD again complained about his slow work and asked once again to treat the disk.
First of all, we look at the SMART hard drive and see unsatisfactory drive status. Attribute Reallocated Sector Count, denoting the number of reassigned bad sectors - lights up red, so the spare sectors on the backup tracks are over and the bad sectors have nothing to reassign. 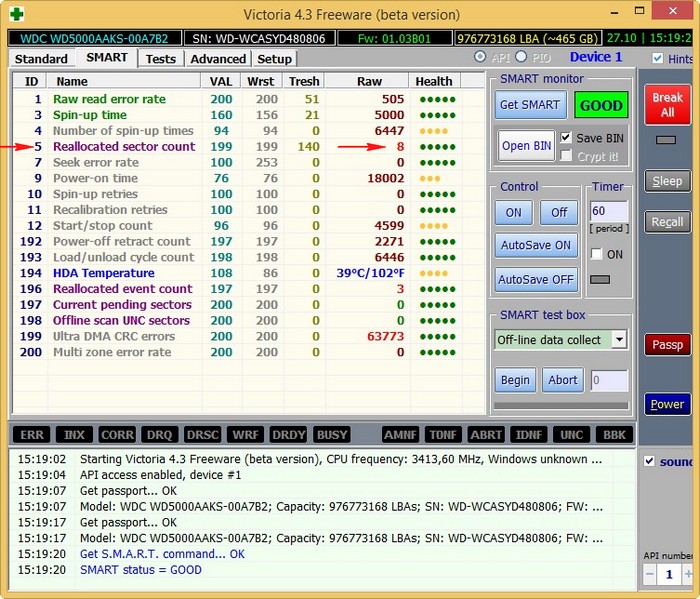
Determine location of bad sectors on the hard drive
Now you need to locate the bad blocks on your hard drive.
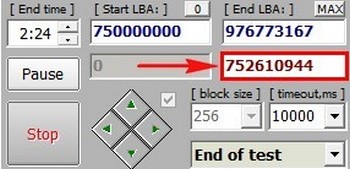
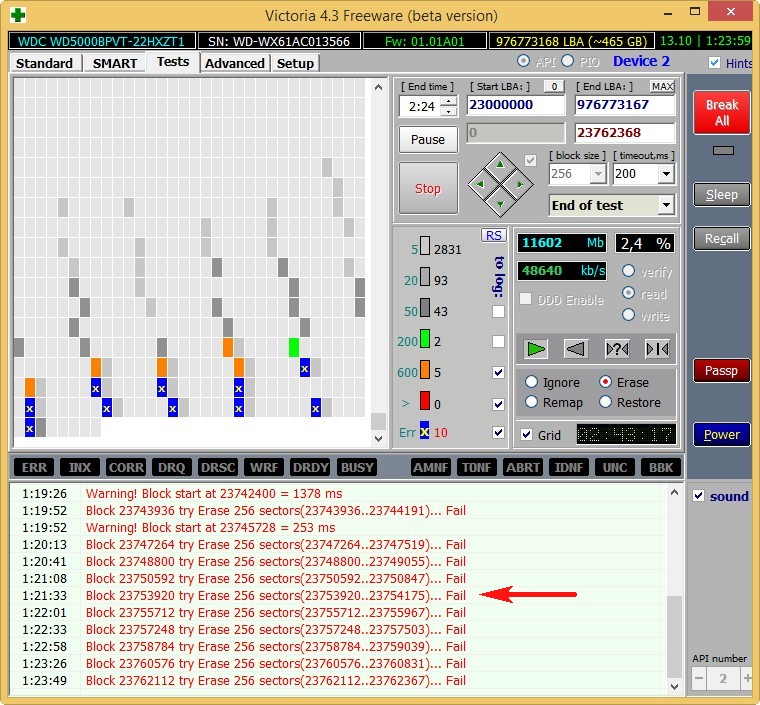
We run the hard drive surface test in the Victoria program and see that immediately after the block number of sectors in the addressingLBA - 752610900 on HDD went sectors with unsatisfactory read latency of 600 ms (candidates for bad blocks). I scanned the surface of this hard drive several times and already know what will happen, so I set the start of scanning the drive immediately from block No.750,000,000 (Start LBA).
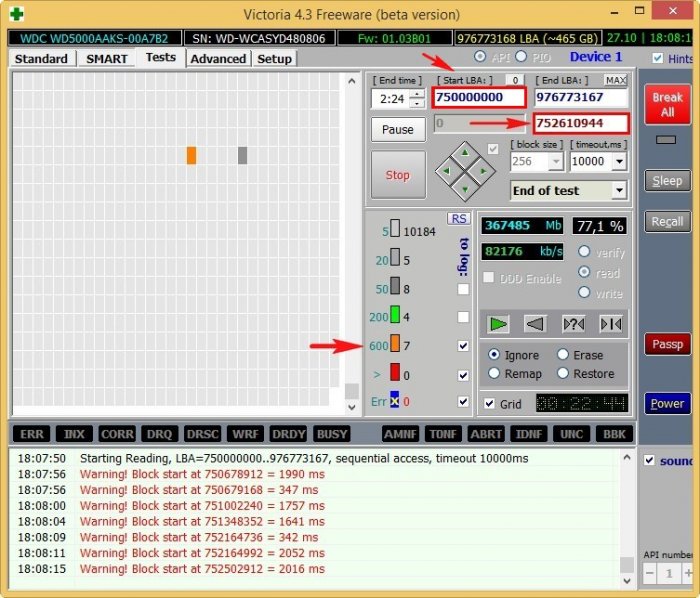
It is from this block of sectors that bad blocks begin to appear.
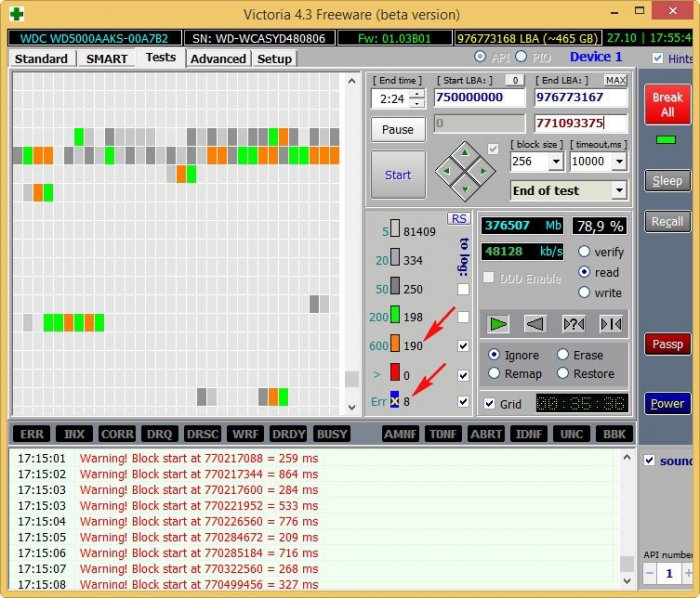
At the end of the scan, sectors with an unsatisfactory reading delay of 600 ms, it turned out to be more than two hundred, and the bad blocks were 8.
- Note: If you come across such a hard drive, first try using algorithmsBB \u003d Advanced REMAP, BB \u003d Erase 256 sect, and finally, if all else fails, record over the entire meadow using the Write (Erase) algorithm, there may well be logical bad blocks and they will be fixed by the program, this is what we were able to achieve in previous articles. If the state of the drive remains unchanged, then nothing will remain for us, as soon astrim the hard drive area with bad sectors. How to do it.
So, we can clearly see that on my drive bad blocks went right afteraddress block sector numbersLBA - 752610900 or look a little lower at the counter of ordinary megabytes (MB), it shows the number 367485 MB (367 GB),
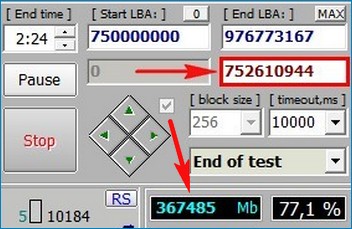
That is, I need from this point to cut off the rest of the hard disk space to its end (turn it into unallocated space). Since our drive is in the volume of 500 GB, or rather 465 GB, it means that we will cut off the space from 465-367 \u003d 98 GB from the end of the hard drive, but it’s easier to cut off with a margin of 100 GB
It is desirable to cut off the space of a hard disk with bad sectors on an HDD that does not contain partitions and no information, although Acronis Disk Director and AOMEI Partition can do this with a disk containing data, but this will take an awfully long time, because programs will move files located on bad sectors, and when accessing this data everything will freeze.
AOMEI Partition Assistant Standard Edition
Before you start, copy all the data from the drive (if possible).
In the main program window, delete the section along with data from our hard drive.
Select the disk (D :) with the left mouse and click on the button Deleting a Section (by the way, you can delete a partition directly in Disk Management).
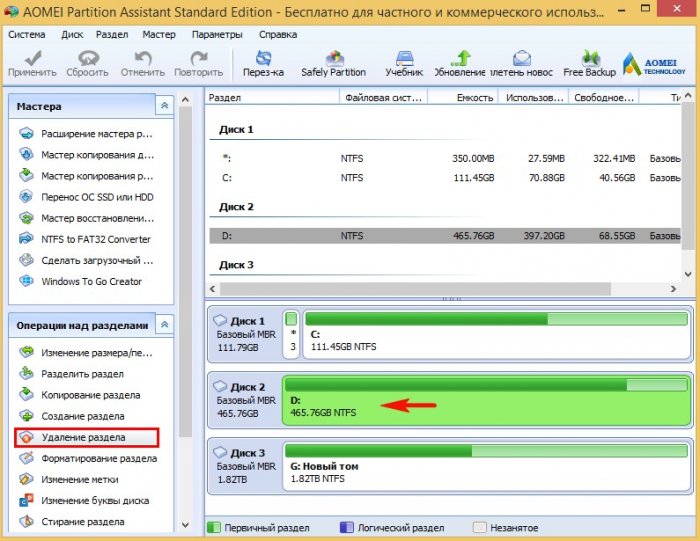
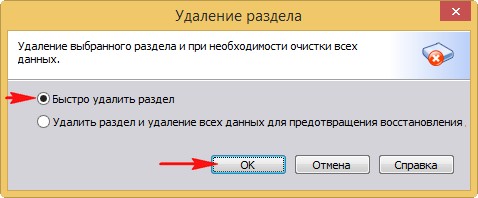
Quickly delete a section.
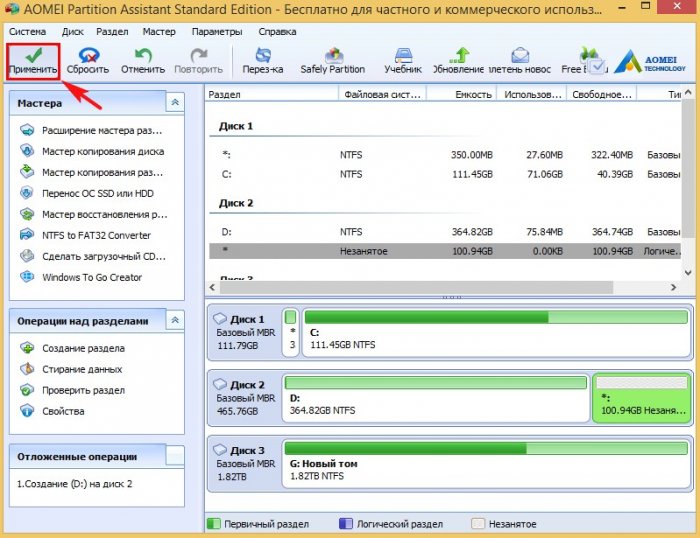
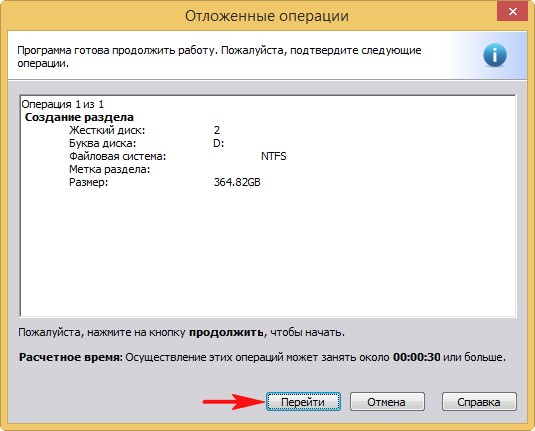
Click on the Apply button.
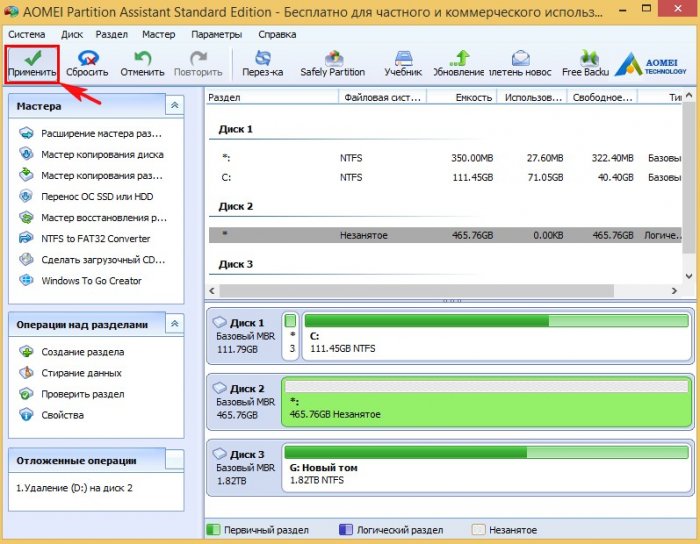
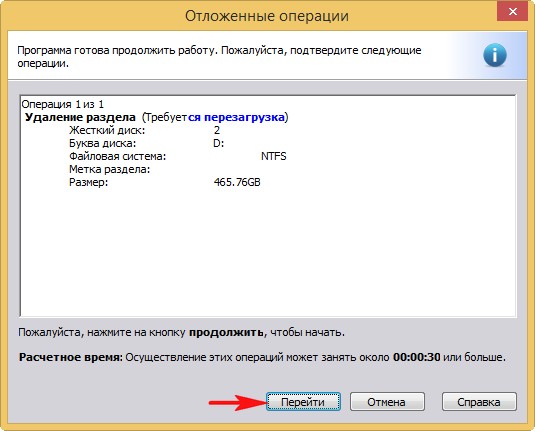
Go to. In some cases, the program may ask for a reboot. Next beginspartition deletion process.
In place of the disk (D :), an unallocated space is formed, select it with the left mouse and click on the button Create Partition.

Click on the button Advanced.
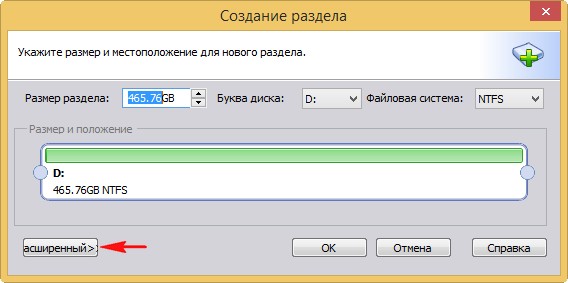
Choose Primary section. We take the delimiter to the left, but not to the end,
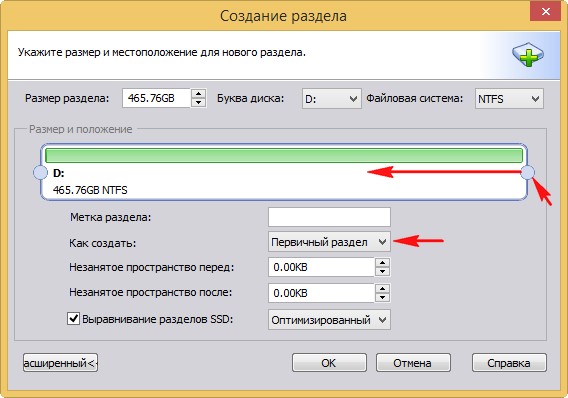
creating disk D: we leave an unallocated area of \u200b\u200b100 GB, it is in this area that bad sectors are located.
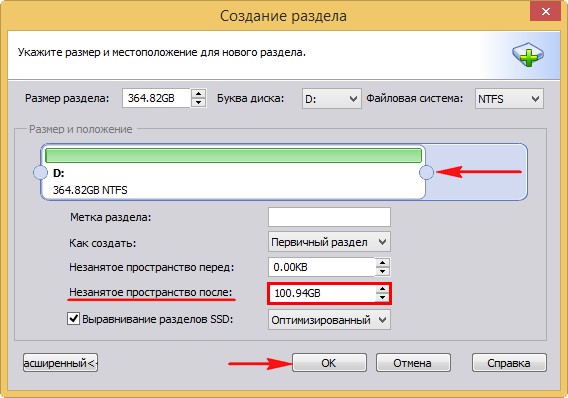
To apply.
Go to.
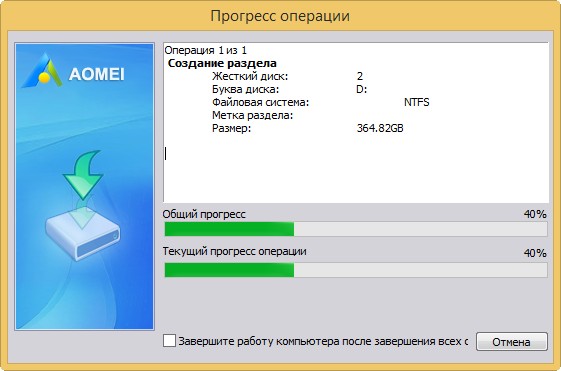
The disc creation process begins (D :).

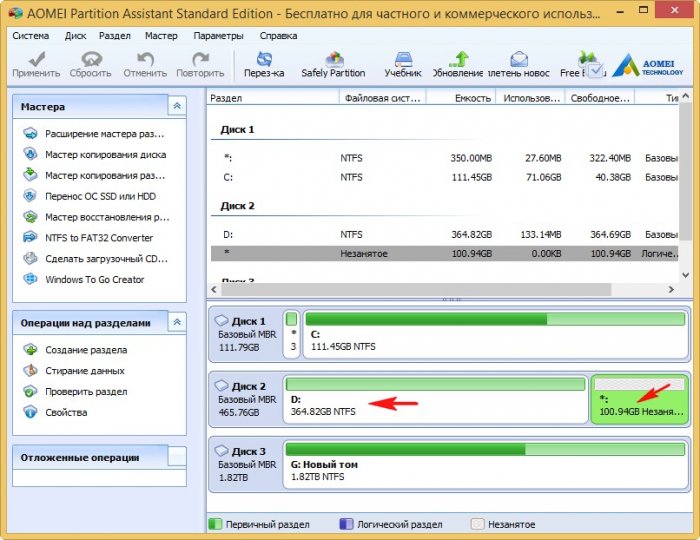
The result of our actions. We created a partition on the hard disk where you can store data or even install an operating system on it. At the end of the section there is an unallocated space where bad sectors (bad blocks) are located.
Did you hear about better program on diagnostics and repair of hard drives called Victoria. We also now know what S.M.A.R.T. and what its attributes say, how to determine the health status of your hard drive or SSD in a second.
In this article, we move on to the most important one, namely the process of restoring information on hard disks and ridding the hard drive of bad sectors (bad blocks), but before starting this article I want to warn you.
Faced with the unsatisfactory operation of the hard disk (squeaks, clicks, freezing of the operating system, inability to copy important data), ordinary users immediately turn to serious programs such as Victoria, MHDD, HDDScan and unfortunately often only worsen the situation. Why? I will answer you.
A lot of what is written about Victoria on the Internet is written by lay people, and by amateurs. Professionals rarely write articles; they are a little lazy in this regard. If you want to know everything about the Victoria program, you first need to work a lot with this program yourself and visit specialized forums on the Internet regarding decoding SMART indicators, recovering data (creating a sector-by-sector image of a sick screw with bads), and the last thing they discuss is the mechanism work program Victoria. It is this sequence in most cases that is correct - first saving data (removing a sector-by-sector image from a faulty hard drive), then treating the hard drive.
- Remember, the most important rule when recovering information from a faulty hard drive and any information storage device is this: the hard drive can "order a long life" at any time, so the number of calls to it should be minimized.So, before working with Victoria, you must make an image of a “sick” hard drive and restore information already from the image, as soon as the information is restored, then you can carry out some operations with the hard drive, for example, treat it with Advanced REMAP or Erase algorithms.
Therefore, in our article today there is a lot of information not only about the Victoria program, but also about the DMDE program, with which we will create a sector-by-sector image of a faulty hard disk, this also needs to be done correctly so that user data does not disappear.
I don’t argue, many readers reading these lines now may not need information on the hard drive, they just want to treat their hard drive from bad sectors (bad blocks) and put it back into operation in order to save money and not buy a new hard drive disk.
In this case, they may simply skip parts of the article.
Friends, if you read these lines, then you have some kind of problem with the hard drive
When we think about something wrong with our hard drive?
1. It is impossible to copy the necessary information from the hard drive to another drive, while copying the operating system freezes and only the reboot saves.
2. Windows may hang unexpectedly at any stage of work.
3. It is impossible to reinstall the operating system; during the installation, Windows hangs on unpacking files or the installer reports the error "Unable to continue installation ...", or Windows installs for a very long time, for example several hours.
4. When you turn on the computer, the utility starts immediately and checks the hard disk partitions for errors.
5. The hard disk makes extraneous sounds (clicks, creaking) and is not periodically detected in the BIOS.
So, let's go, firstly, in Victoria we will precisely set the numbers of bad sectors (bad blocks), then we will make a sector-by-sector copy of the hard disk and this will save user data, and then we will hide the bad sectors of bad blocks (remap) in Victoria. We also learn how to do "Record across the meadow" (Erase test), that is, if a bad sector is detected, rewrite the entire block (256 sectors) of the hard disk with zeros.
Note: If you haven’t read, then you will not understand everything, so I recommend that you read the initial article first, then move on to this one.
You are currently reading the second article, but there are more articles:
For example, take a real hard drive with bad sectors
Friends, the minimum unit of information on the hard drive is a sector, the amount of user data is 512 bytes, if the information in the sector cannot be read, then the sector is unreadable or in other words is bad. All freezes of the operating system occur when reading information from such a sector.
This WDC WD5000AAKS-00A7B2 hard drive (500 GB capacity) is really defective,
The operating system on it constantly hangs and from time to time, when loading, the hard disk is checked for errors. The last straw for the owner of the hard drive was that it was not possible to copy important data to another disk and even reinstalling the operating system ended with another hang on unpacking Windows files, replacing the installation disk with the operating system did not work, the hang was repeated at another stage of installation.
And then the question arose of what to do with this hard drive, because one of the sections contained important data and needed to be copied.
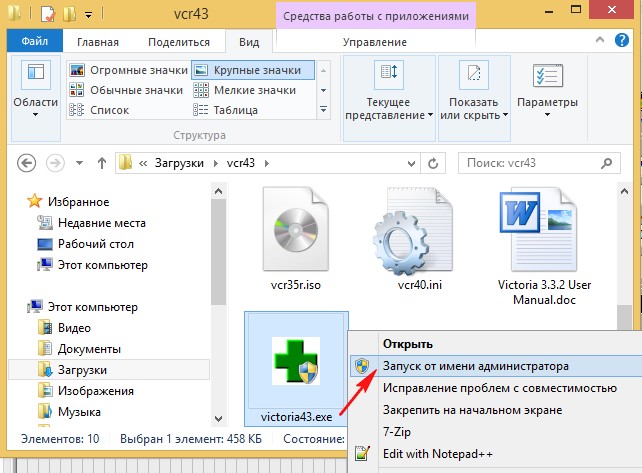
Launch Victoria
Launch Victoria program as administrator. We agree with all warnings about working in a 64-bit system.
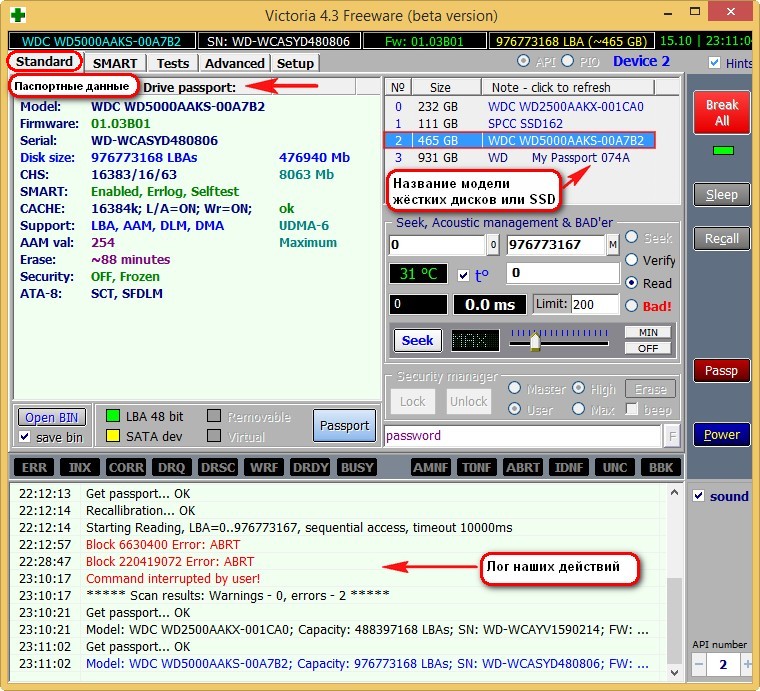
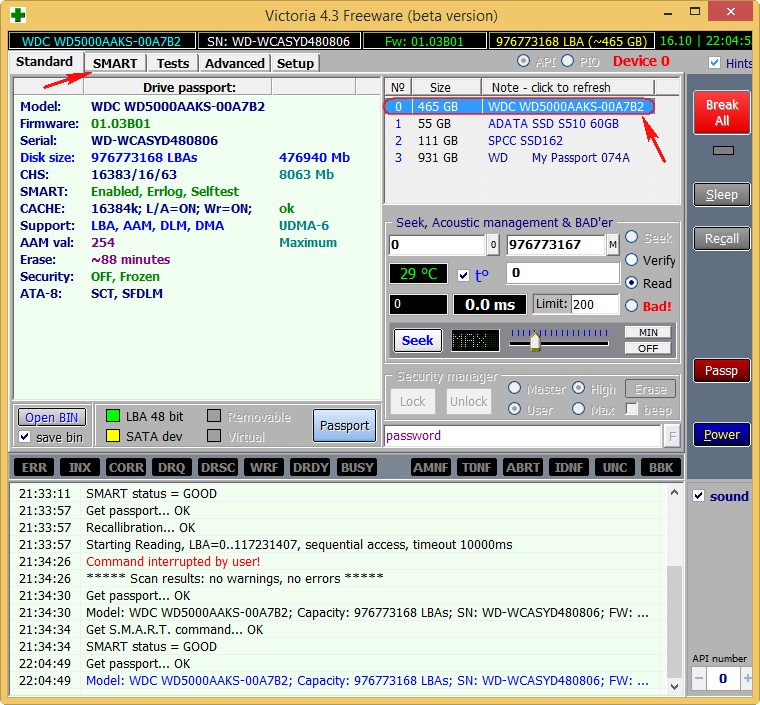
Select the initial tab Standard. If we have several hard disks, in the right part of the window we select the necessary hard disk with the left mouse, in our case WDC WD5000AAKS-00A7B2
and go to the SMART tab,
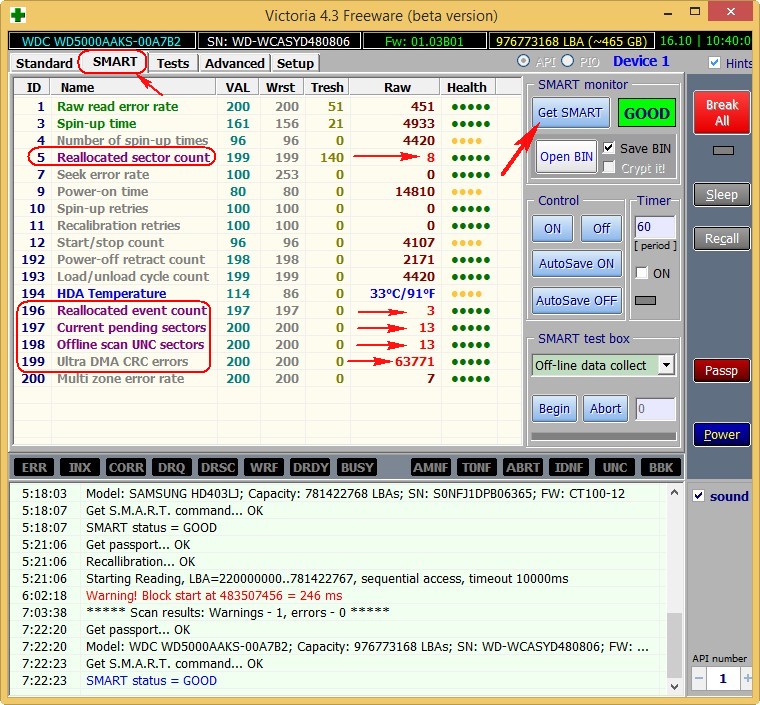
press the Get SMART button, the GOOD message will light up to the right of the button and S.M.A.R.T. will open. selected hard drive.
5 Reallocated Sector Count - (remap), denoting the number of reassigned sectors, this means the spare sectors on the backup tracks end and soon there will be nothing to reassign the bad sectors.
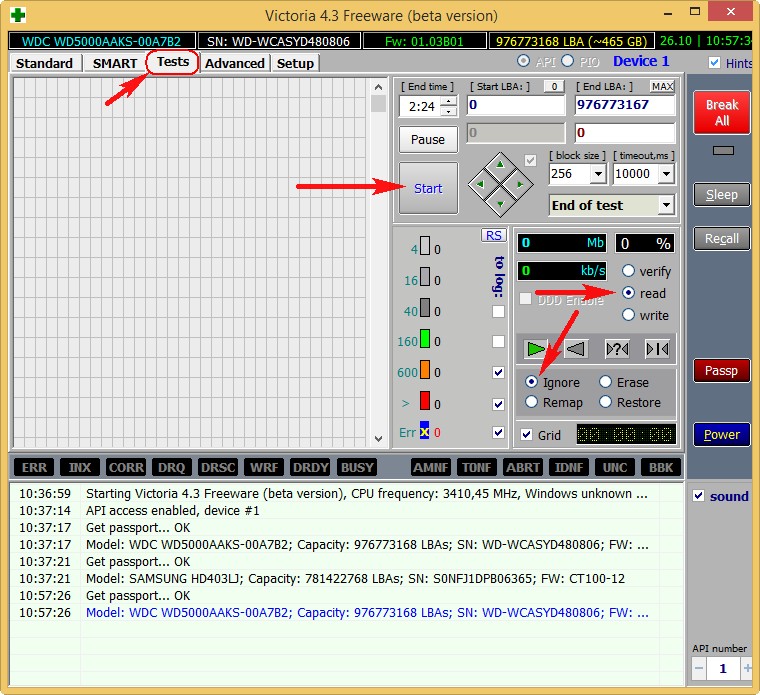
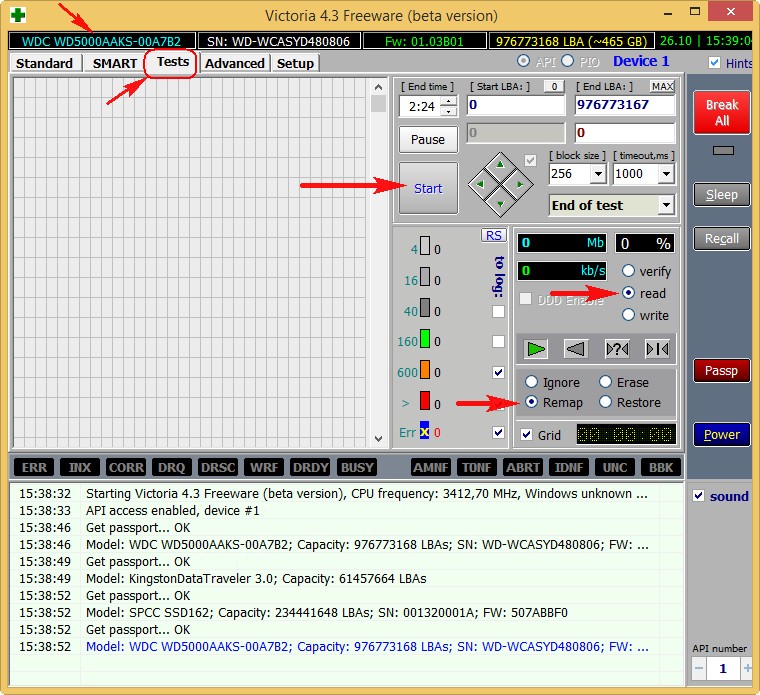
Go to the Tests tab.
Hard drive surface test in Victoria!
In the right part of the program window, select Ignor and read, then click Start. This starts a simple hard disk surface test without error correction. This test will not bring any bad or good effects on your hard drive, but when the test is over, we will find out what state our hard drive is in.
Scanning of the surface of the hard disk begins and after a while bad sectors are detected. After 40 minutes, Victoria gives us this result:
A lot of good sectors with a good reading delay of not more than 5 ms - 3815267
There are also sectors with a bad reading delay of 200 ms
There are no sectors with an unsatisfactory reading delay of more than 600 ms (candidates for bad blocks), but ...
Which is very bad, there are full bad sectors (bad blocks), information from which they could not read at all - 13!
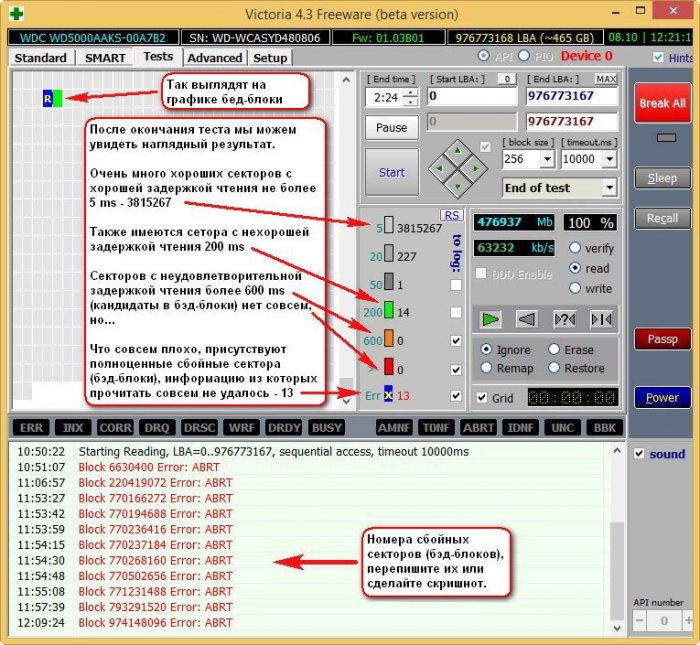
13 bad sectors (bad blocks), they all start in the 6630400 area, and end at 980000000, that is, they are scattered throughout the hard disk. Bad block numbers need to be recorded. Friends, it is quite possible all of our problems with the hard drive may be due to these 13 bads and you need to get rid of them, but first we will make a sector-by-sector image of the sick screw.
The hard drive of the affected WDC WD5000AAKS-00A7B2 (500 GB capacity) was divided into two sections: drive D: with the operating system capacity of 120 GB and drive E: with data capacity of 345 GB.
Before working with the Victoria program, we will protect ourselves and make a full image of the E drive partition: the volume is 345 GB and we will pull the data from the image. We will create the image in another DMDE program and place it on another physical disk SAMSUNG HD403LJ (400 GB), I will show you how to do it.
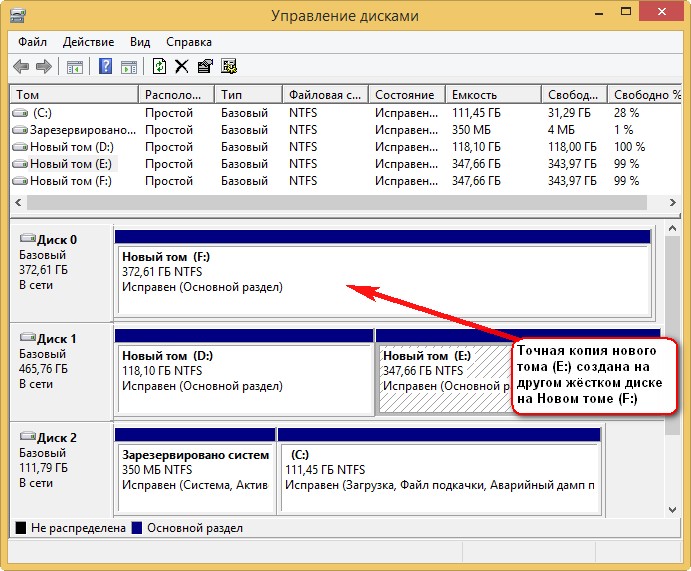
Disk Management of my computer
Left click to enlarge screenshot
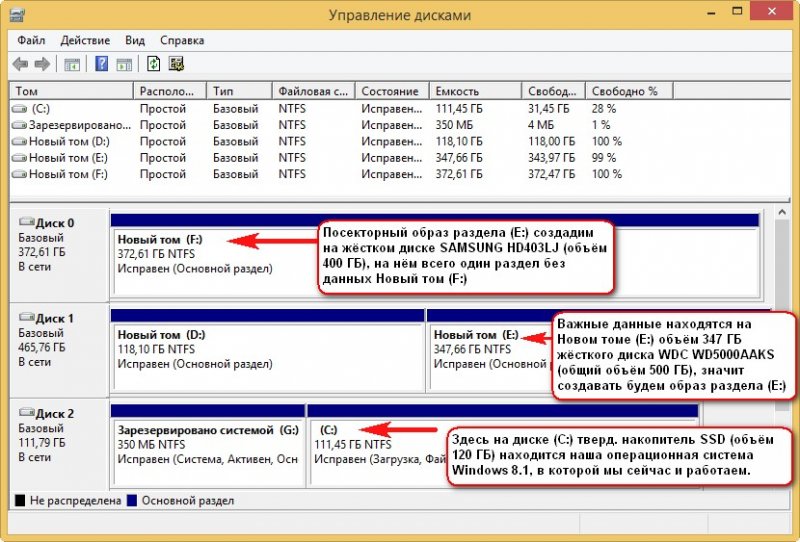
Important data is on the New Volume (E :) the volume of 347 GB of the WDC WD5000AAKS hard disk (total volume of 500 GB), then we will create the image of the partition (E :)
We will create a sector-by-sector image of the partition (E :) on the SAMSUNG HD403LJ hard drive (400 GB in volume), on it there is only one partition without data. New volume (F :)
The third physical disk in the system is a solid-state drive SSD (120 GB) drive (C :), it contains our working Windows 8.1 operating system, which we are now in.
Creating a sector-by-sector image of the entire hard disk or the desired partition in the DMDE program
DMDE is also a very good tool for creating sector-by-sector copies of a failed hard drive.
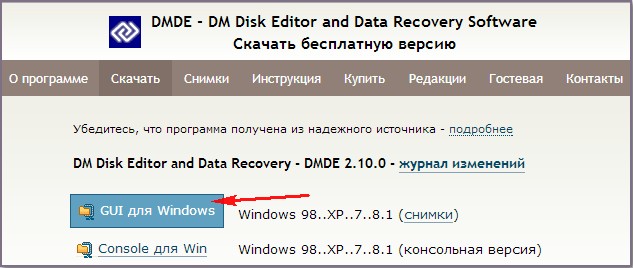
We go to the DMDE program website http://dmde.ru/download.html and download the program, click on the GUI for Windows.
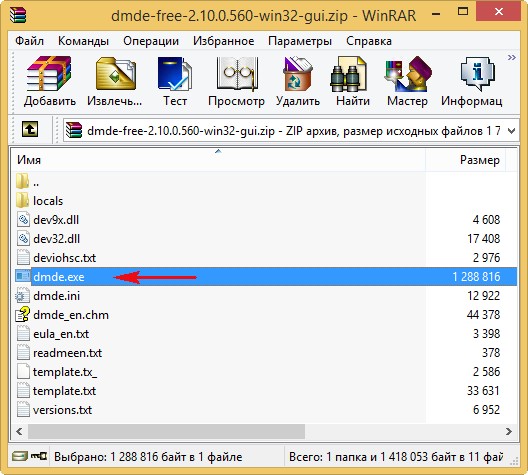
DMDE is downloaded in the archive, unzip it and run the file dmde.exe.
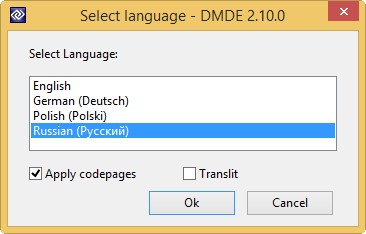
Then select the language Russian.
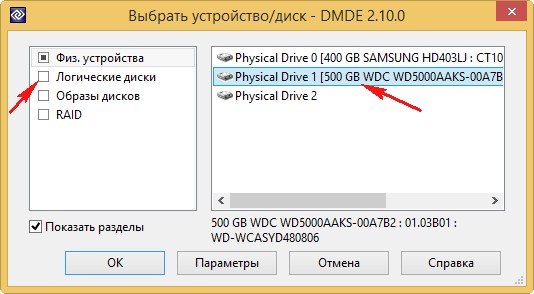
We accept the terms of the License Agreement. In the initial window of the program, we need to select either a Physical device (that is, a completely hard disk) or a data section to create an image.
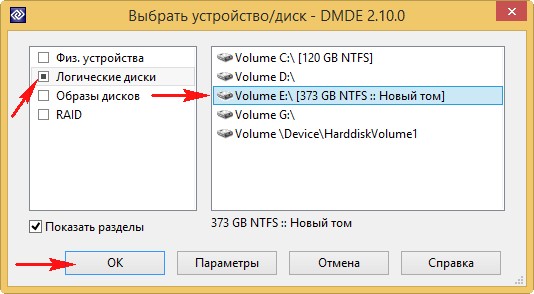
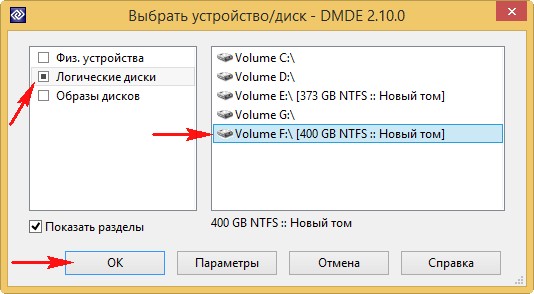
We only need the volume (E :), so left-click on our WDC WD5000AAKS hard drive, then select Logical drives
and the section (E :), then click OK.
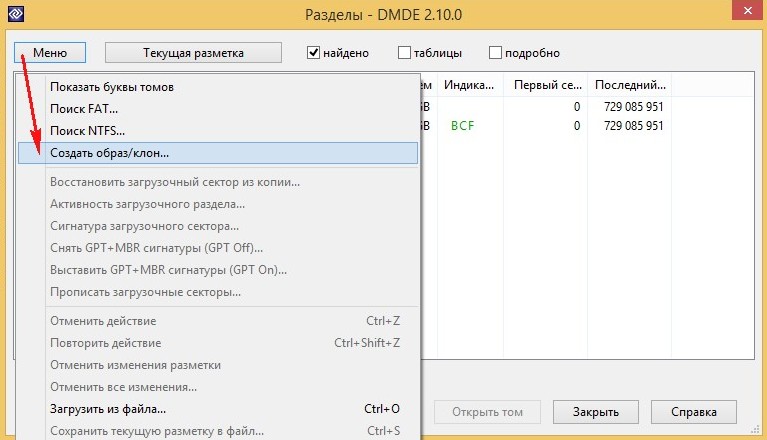
Menu. Create image / clone ...
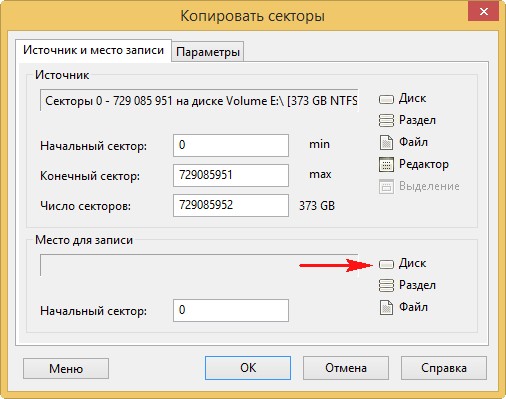
Place for recording, click Disk.
New volume (F :) and OK. It is necessary that the partition on which the sector-by-sector image of the faulty hard disk (or the section with unreadable data) is created should be no less than the volume of this disk.

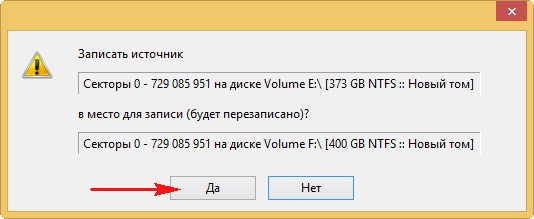
On the new volume (F :), all data will be deleted, agree Yes.
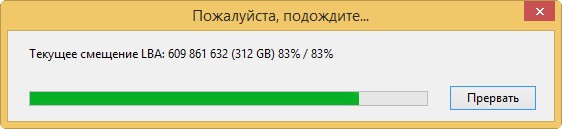
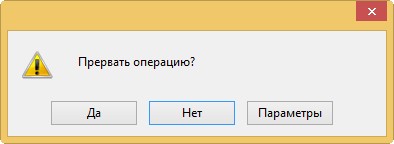
Creation of a sector-by-sector copy of the partition (E :) of a sick WDC WD5000AAKS hard drive on a new volume (F :) of another healthy SAMSUNG HD403LJ hard drive, which lasts 6 hours (the image is removed from especially "bad" screws), and hangs tightly at 83 percent, after waiting a couple of hours, I clicked on the Abort button!
Friends, if you interrupt the creation of the image of the sector-wide section at the very end (after all, 83%), then there are two options for us, as Suvorov used to say - "either the chest in the crosses, or the head in the bushes."
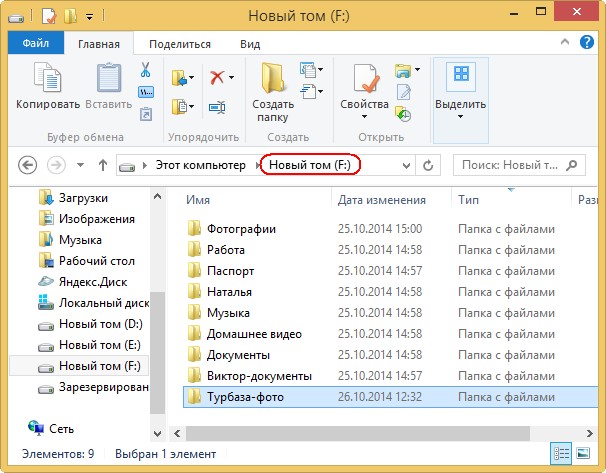
After interrupting the operation, go to the New Volume (F :) and see if there is any data on it and ... it is, all the main things that we needed were the DMDE program could transfer to the dick (F :), almost all the data read without errors. So the case here is not complicated and the problems are mainly software.

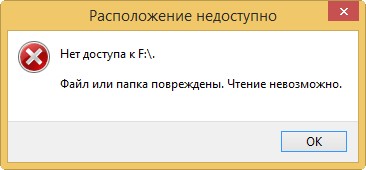
But in some cases, not everything will be so rosy, and when you try to enter a section with a sector-by-sector copy, this error will be waiting for us: No access to F: \\. The file or folder is damaged. Reading is not possible.
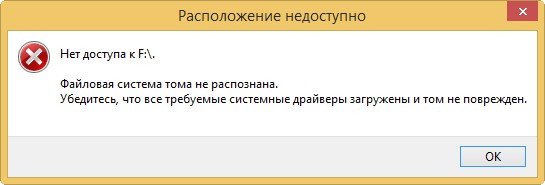
No access to F: \\. File system not recognized. Ensure that all required system drivers are loaded and that the volume is not corrupted.
But in this case, we will not give up and will do so.
What to do if creating a sector-by-sector image fails
Friends, the process of creating a sector-by-sector copy is not always successful even after a few hours, but if you stop creating a sector-by-sector copy, the data in it may be unreadable.
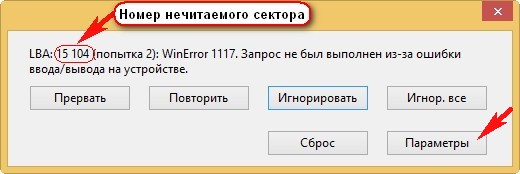
Or in the process of creating a sector-by-sector copy, such an error will appear " The request was not completed due to an I / O error on the device"(see screenshot below) indicating that DMDE could not read the information in the bad sector (sector number is indicated in the error) in this case, click
“Repeat”, there will be a second attempt to read information from this sector and it may end in success. If this error with the same sector appears again, then click
"Ignore" and the creation of a sector-by-sector image will continue but we will lose information in this sector and as a result, one sector file will not open in a sector-by-sector copy. If the error "The request was not executed due to an input / output error on the device" appears too often, you can select
"Ignore everything" and similar errors will be skipped, or you can click the button
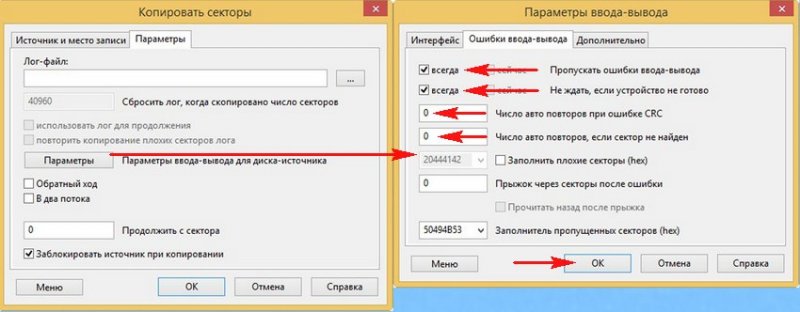
"Parameters"and appropriately configure the DMDE program for such a difficult case. Click the Options button in this window.
"Reverse", sometimes it brings a result.
And click again "Parameters".
In this window, check "- Is always". If you select the option, the operation will continue even
in case of an error related to the lack of readiness of the device. If this option is not checked, then a warning with the expected user response will be displayed on some "bad" winchesters, that is, the image will not be created on the machine.
The number of repetitions of a car with CRC - 0
Fill Bad Sectors (hex)
Then OK and OK, begins the creation of a sector-by-sector image.
Left click to enlarge image
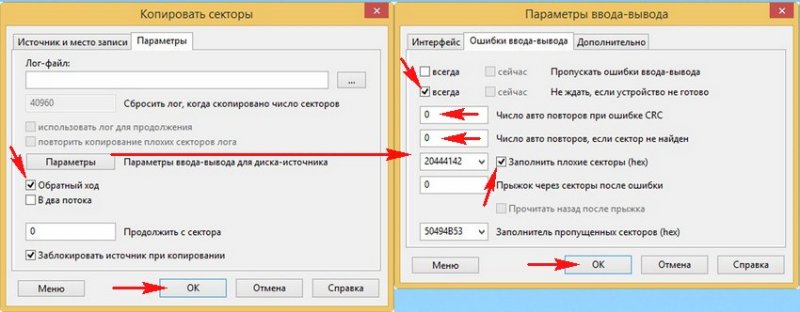
Also workable proved this option settings.
Skip I / O Errors - Always
Do not wait if the device is not ready - Is always
CRC error retry count - 0
The number of auto retries if the sector is not found - 0
In general, I advise you to study the manual for the DMDE program http://dmde.ru/manual.html or http://dmde.ru/docs/DMDE-manual-ru.pdf, you can also wait for our article on creating a sector-by-sector image of a faulty hard disk with various programs, in it we will even consider creating a bootable flash drive with the DMDE program.
- If DMDE does not help you, then you can try other programs, for example. Of course, there are still ways with which you can make a sector-by-sector image of a bad screw, for example, boot from some Linux-based operating system, for example Ubuntu, but I won’t describe the process here and I’ll write a separate article better. Also under Linux, you can run the safecopy utility.
- What to do if you still cannot make a sector-by-sector copy of the hard drive, you should choose. You can contact a good and proven data recovery service and a sector-by-sector copy from your hard drive will be removed using special expensive equipment by specialists, for example, using the same PC-3000 complex. If you are not sorry for your data, then you can take the risk and run algorithms in Victoria that save the surface of your hard drive from bad sectors (bad blocks), as described below, the hard drive can come back to life after this operation.
- Important: Kazan(developer of the program Victoria) promises that the most innovative bad block hiding algorithm BB \u003d Advanced REMAP is NOT destructive for data, but in some cases it can be destructive for your files, since even Victoria’s most advanced algorithm Advanced REMAP hiding defects (remap), this is for any change in the translation of the screw, which means the loss of user data (details below. I want to say that sometimes it happened that Victoria will cure the hard drive from bads and you will even be able to copy the info from such a hard drive, but unfortunately not all the information It turns out readable.
So, in our case, it was possible to make a sector-by-sector copy of a diseased hard disk, namely, a new volume (E :), the DMDE program, though in some places the DMDE was a little freezing, but it ended successfully. The sector-by-sector copy of the new volume (E :) is an exact copy and is located on the volume (F :). All available data is successfully read and copied.
The main task is solved and user data is saved, now we proceed to the procedure for treating a hard disk.
How to get rid of bad sectors (bad blocks) using Victoria
Friends, let's now imagine that we did not manage to make a sector-by-sector image of the hard drive with bad blocks and we didn’t come up with anything else and decided to rid our hard of bads in the Victoria program, in the hope that after hiding bad sectors we will be able to read and copy the information to your hard drive.
Note: it is difficult to get rid of bad screws in running Windows, especially if, for example, you have a laptop with one hard drive and the operating system is installed on the same hard drive and you want to cure the same operating system from bad blocks. In such cases, create a bootable USB flash drive with Victoria, load a laptop from it and get rid of bad sectors. I propose to create a bootable USB flash drive in the next article, and now we will learn how to do it directly in a working operating system, I will demonstrate everything to you.
Remap
In the main window of Victoria, we mark the Remap item, which indicates the algorithm for reassigning bad blocks to sectors from backup tracks during the scanning process. The test is in Read mode, that is, from start to finish and click on the Start button.
We’ll talk about this while scanning.
1. What happens with this Remap algorithm? An attempt is made (several times) to force information to be written to the bad sector of the hard drive, if the attempt is successful, then the sector becomes healthy and is removed from the list of bad blocks (remap does not occur). If the recording attempt is unsuccessful, then the diseased sector is reassigned to the healthy sector with the backup track of the hard drive specially designed for such cases.
2. Remap is the reassignment (replacement) of the diseased sector, the assignment of its LBA number to another physically healthy sector from the backup track. Information from the sector (at the time of reassignment) hangs in the RAM of the screw, and as soon as the sector is reassigned, it is written back.
Remap is basically not destructive for information, if your data is lost, then only in one bad sector, but you must admit that the data in the bad block was unreadable anyway. In the second case, the data will simply be transferred to the sector from the backup track.
Result. As I said in a running Windows, it’s hard to fix anything and Victoria cannot implement Remap. After 20 minutes, the same result, 13 bad blocks, and you and I will have to make a bootable flash drive with Victoria and work in DOS.
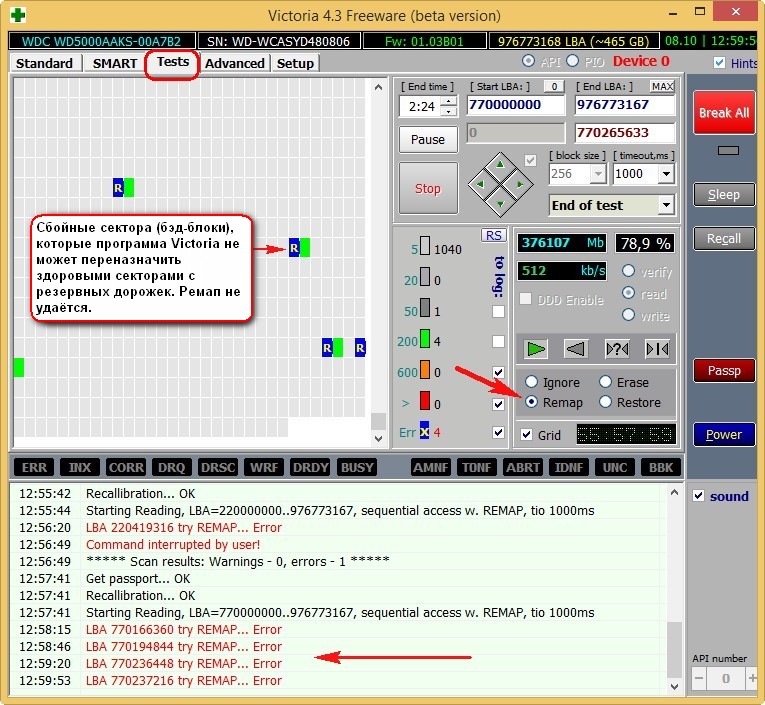

How to scan a specific area on the hard drive in Victoria
If you know the exact addresses of bad sectors, you can set the exact scanning parameters in Victoria. For example, we know that our bad blocks start from sector 770,000,000, then in paragraph Start LBA: (carefully, in some cases your data on the hard drive will be deleted).
- Most often, software (software) troubles come across, which are removed most quickly by zeroing - the Erase algorithm, and even if the write to the sector of zeros is unsuccessful, Remap may occur, since the hard drive firmware may consider such a sector to be bad. If Erase doesn’t help, then you can choose Remap, but as we know, the chances that Remap will be made in running Windows are small.
- Soft (software) bads in some cases can be removed even by simple formatting using Windows itself. The whole difference between existing bad blocks: physical and software, read in our article. In a nutshell, I’ll explain that it is impossible to restore physical problems (a physiologically destroyed sector) (only remap, reassignment is possible), and logical (software, sector logic errors) can be restored.
- Friends, we can, but then our article will be even longer, we will do this in the next article.
I don’t feel like experimenting with our WDC WD5000AAKS hard drive, because in the next article I plan to cure it from bad blocks in DOS mode using a bootable USB flash drive with Victoria and still return the bad drive-cured hard drive with intact data to the host.
I will just show you on another hard drive how to run this test in running Windows.
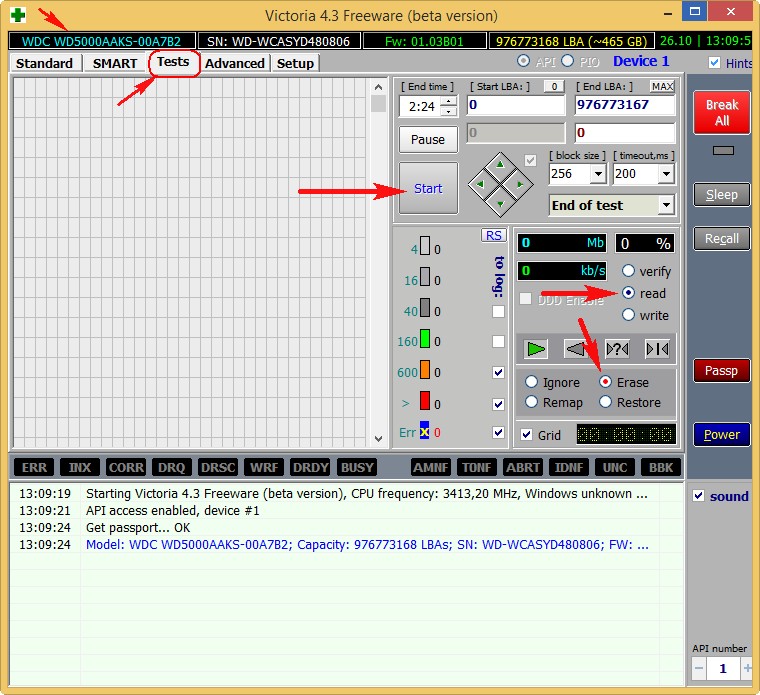
In the main window of Victoria, select our hard drive and go to the Tests tab, select the Erase item (caution, in some cases your data on the hard drive will be deleted) - upon detection of an unreadable sector, forcibly rewrites the entire block of 256 sectors with zeros, of course, the information in the whole block of sectors is completely lost, but if overwriting occurs, the block returns to work (it becomes healthy).
The test is in Read mode, that is, from start to finish and click Start.
Often when "zeroing" in running Windows, these errors will appear:
Block (bad sector number) try Erase 256 sectors. It was not possible to rewrite the block of sectors.
Write Algorithm
Write mode does not look for any bad sectors, but simply immediately erases all the information on the hard disk by filling all sectors with zeros, this is in the jargon of the “Write across the meadow” repairmen, this algorithm can cure the hard disk from bads and simply bad sectors with large reading delay but nafter such a test, it will be impossible to recover data on the hard disk, so copy all important files to the portable hard disk first.
Hello admin, question! My computer is 5 years old and it began to freeze noticeably when working in various applications. Often when you turn on, the utility automatically checks the hard disk for errors. Reinstall Windows I didn’t help and I had to turn to a familiar computer technician, he scanned the hard drive with Victoria and I had a lot of sectors with a delay of more than 200 ms and a delay of 600 ms (candidates for bad blocks). My buddy said what to do« Record across the clearing» in other words, to perform sector-by-sector erasure of information from a hard disk. Hence, actually the question is how to do it yourself, as my friend always has no time.
Hello friends! This article is a continuation of the story about the Victoria hard drive repair program, and of course it would be better if, before reading this article, you.
Briefly remind you what was discussed in the first article.
If your operating system slows down and freezes, and the hard drive sometimes makes extraneous sounds, then it could be in bad sectors (bad blocks).
Bad sectors are of two types: physical and logical.
Physical Bad Blocks - This is a mechanically deformed sector of the hard drive, from which it is impossible to read information, and it is also impossible to write data to it. It is impossible to fix such sectors with any programs. The firmware built into the hard disk should detect the bad sector that appeared on time and reassign it to the normal sector from the backup track. The faulty sector at this moment is taken out of operation and information about it is entered in a special defect list. But it often happens that bad blocks are present on the hard drive, but they are not hidden. In this case, you need to hint the firmware built into the hard disk about the presence of bads on the hard drive using special programs for working with hard disks (Victoria, HDDScan, MHDD) and only after that the bad blocks will disappear if the outcome is favorable.
- Note : who are interested, a more detailed article about bad sectors (bad blocks) .
Logical Bad Blocks - they are found much more often, this is information incorrectly recorded in the sector, which the magnetic head of the hard disk cannot read or reads with a significant delay, if there are many such sectors, then our computer can also work slowly.
You can use the Victoria program to diagnose your hard drive.
To make everything clear to you, I propose to consider this issue with a specific example.
Meeting 10 years later ...
A few days ago a friend came to me with a system unit under his arm and complained about the strange operation of the computer (freezes, brakes, constant checks of the hard disk for errors when it was turned on), reinstalling the operating system did not help.
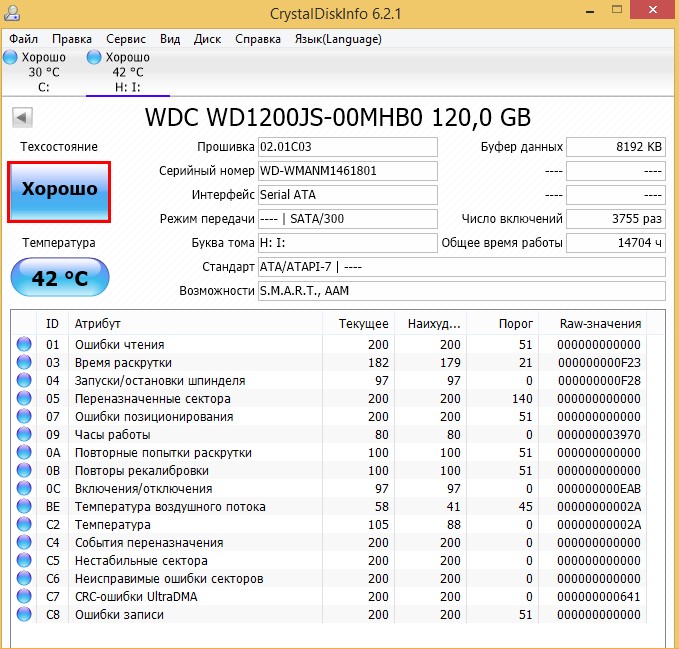
The system unit turned out to be perfectly clean inside, and the temperature of the processor, video card, hard drive is normal. Of course, my suspicions fell on the hard drive, which upon closer inspection turned out to be a famous veteran WDC WD1200JS-00MHB0: 120 GB SATA-II, once popular high-performance black hard drive series Caviar sefrom the manufacturer Western Digital! Friends, I bought this disc to my friend 10 years ago, pay attention to the production date - October 16, 2005!

So, let's see what the health of our old friend and why it began to hang and slow down!
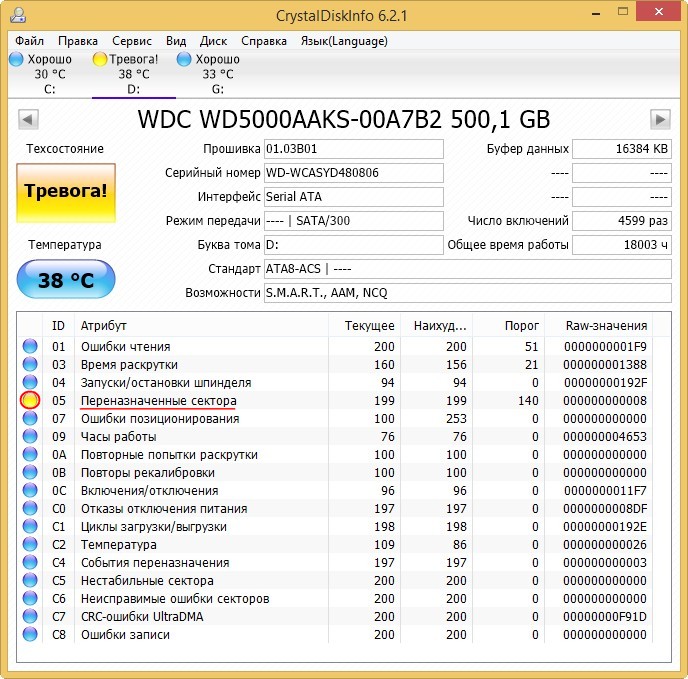
I start the CrystalDiskInfo program from a flash drive and watch SMART (hard disk self-diagnosis), there is nothing criminal, the technical condition is Good.
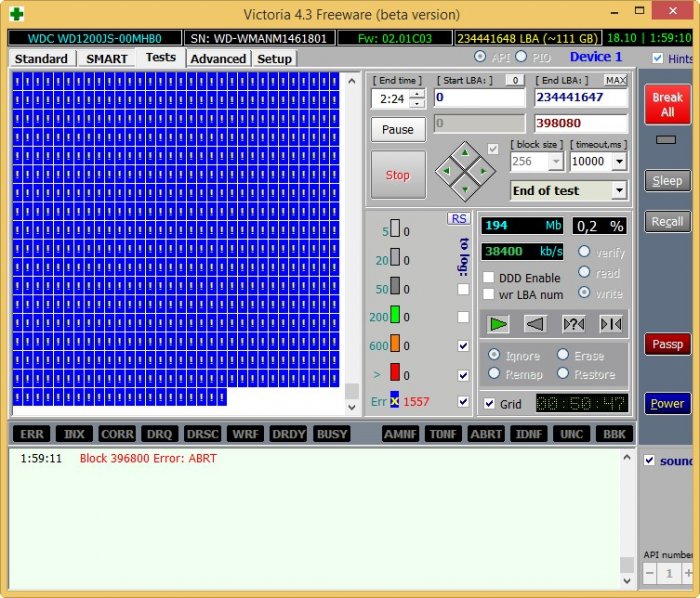
I also launch the Victoria program directly in running Windows 8.1 and be sure from the administrator, I begin to test the surface of the hard drive.
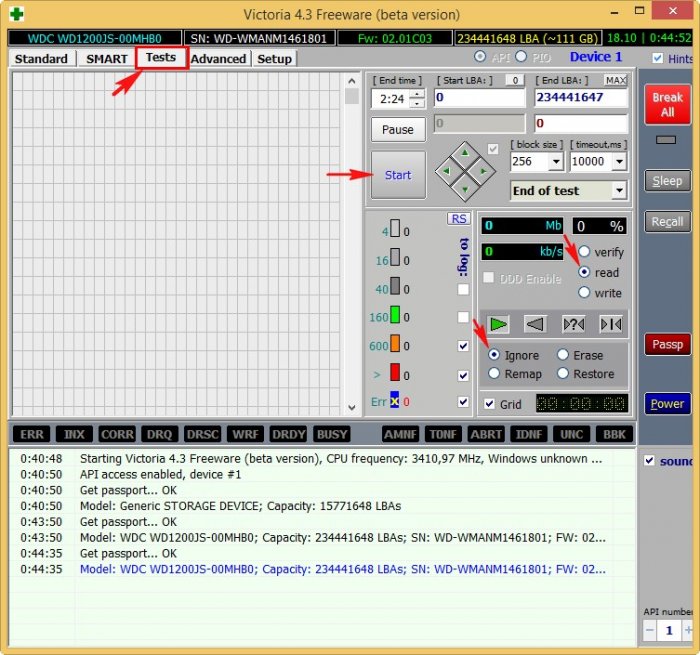
In the initial program window, select the tab Standard and in the right part of the window I select the WDC WD1200JS-00MHB0 hard drive with the left mouse.
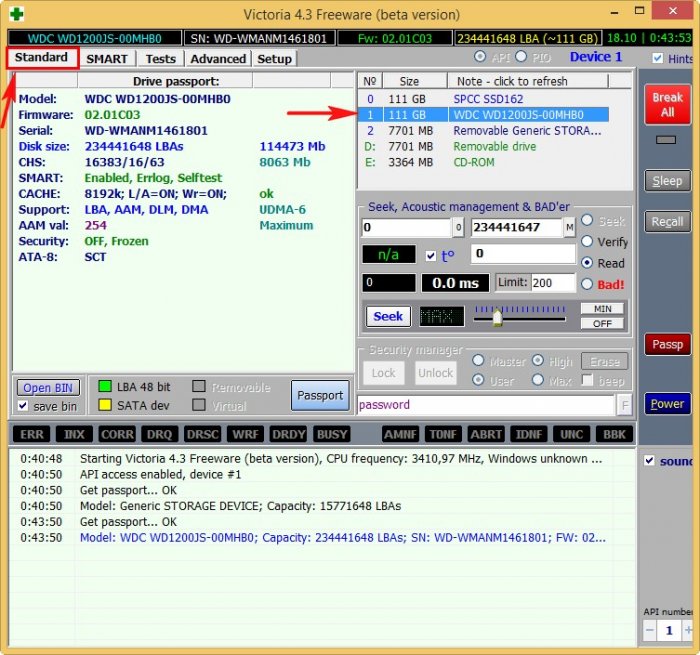
I go to the tab Tests and mark the pointsIgnor and read, click Start . A simple hard disk surface test is started without error correction. This test is not dangerous for the information on the hard drive. I am interested to know in what condition the hard drive is after ten years of work. The most important thing is not to run any programs during the test, otherwise errors may occur, in general, it is ideal to test the HDD in DOS mode using the Victoria’s bootable USB flash drive, but we will do this a bit later.
After 30 minutes we get the test result:
In our case, there are no bad blocks, but there are sectors with large with a delay of more than 600 ms, we look at the screenshot, everything is shown by arrows.
500 blocks of sectors with a delay of more than 50 ms.
31 blocks sectors with a delay of more than 200 ms.
7 sector blocks with a delay of more than 600 ms (sector blocks with such a delay are dangerous and are most likely candidates for bad blocks).
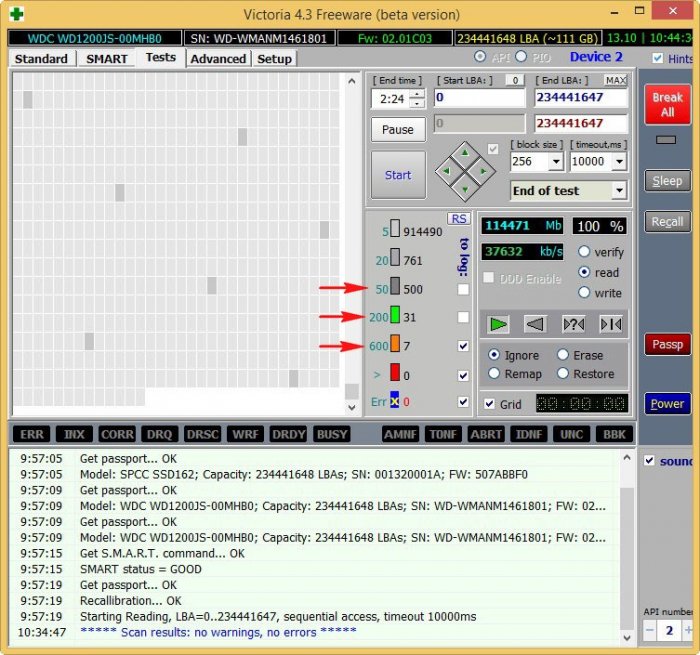
There is a small chance that due to these seven sectors, computer freezes occur.
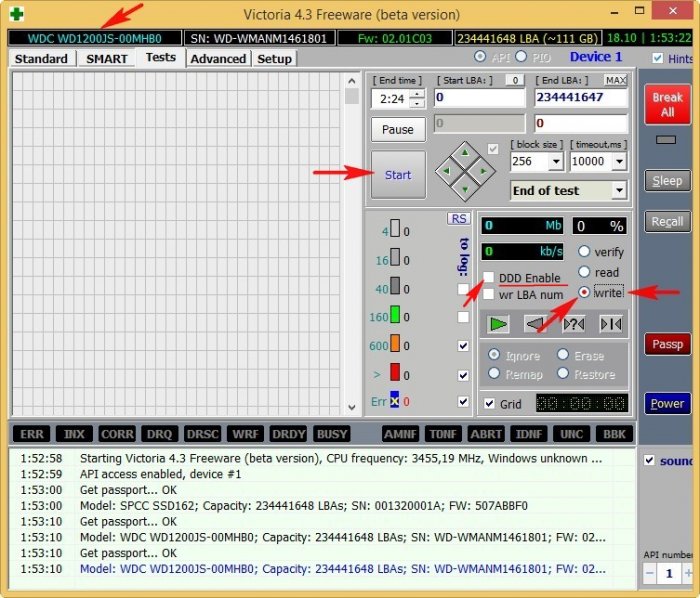
I suggest applying the algorithm for the hard drive in Victoria Write (Recording, erasing) in the jargon of repairmen - "Recording across the clearing." There will be sector-by-sector erasure of information from the disk in blocks of 256 sectors and subsequent forced recording to sectors of zeros. In this way, you can get rid of logical bad blocks and, in some cases, physical bad blocks (a remap will occur).
Logical "bads" after such a forced recording will simply lose incorrect information in their sectors, it will be overwritten with zeros.
Physical "bads" can disappear from the fact that Victoria will show them too clearly on the firmware of the hard disk and that she will simply reassign the bad blocks as backup sectors from the spare tracks!
Tab Tests mark the itemWrite (Record, Erase). Caution, all information will be deleted from the hard drive! Therefore, make sure that you have selected the drive under test correctly. You can mark the itemDDD Enable (enhanced erasure).
I press Start.
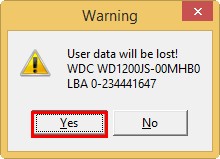
Will be lost (all user data on the WD1200JS-00MHB0 hard drive will be lost).
We agree. Yes.
The process of sector-wise erasing of information from the hard drive begins
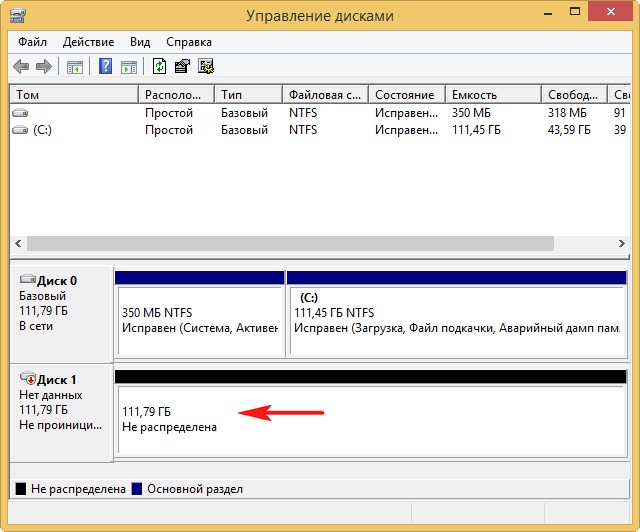
If we start Disk Management at the moment, then we will see that all partitions on the tested hard disk are deleted along with the data.
At the end of the erase, we again perform a simple test of the surface of the hard disk.
Tab Tests mark the pointsIgnor and read, click Start . A simple hard disk surface test is started without error correction.
After 30 minutes I get the result, all sectors with large delays are fixed.
We learned about the best hard drive diagnostic and repair program called Victoria. We also now know what S.M.A.R.T. and what its attributes say, how to determine the health status of your hard drive or SSD in a second.
In this article, we move on to the most important one, namely the process of restoring information on hard disks and ridding the hard drive of bad sectors (bad blocks), but before starting this article I want to warn you.
Faced with the unsatisfactory operation of the hard disk (squeaks, clicks, freezing of the operating system, inability to copy important data), ordinary users immediately turn to serious programs such as Victoria, MHDD, HDDScan and unfortunately often only worsen the situation. Why? I will answer you.
A lot of what is written about Victoria on the Internet is written by lay people, and by amateurs. Professionals rarely write articles; they are a little lazy in this regard. If you want to know everything about the Victoria program, you first need to work a lot with this program yourself and visit specialized forums on the Internet regarding decoding SMART indicators, recovering data (creating a sector-by-sector image of a sick screw with bads), and the last thing they discuss is the mechanism work program Victoria. It is this sequence in most cases that is correct - first saving data (removing a sector-by-sector image from a faulty hard drive), then treating the hard drive.
- Remember, the most important rule when recovering information from a faulty hard drive and any information storage device is this: the hard drive can "order a long life" at any time, so the number of calls to it should be minimized.So, before working with Victoria, you must make an image of a “sick” hard drive and restore information already from the image, as soon as the information is restored, then you can carry out some operations with the hard drive, for example, treat it with Advanced REMAP or Erase algorithms.
Therefore, in our article today there is a lot of information not only about the Victoria program, but also about the DMDE program, with which we will create a sector-by-sector image of a faulty hard disk, this also needs to be done correctly so that user data does not disappear.
I don’t argue, many readers reading these lines now may not need information on the hard drive, they just want to treat their hard drive from bad sectors (bad blocks) and put it back into operation in order to save money and not buy a new hard drive disk.
In this case, they may simply skip parts of the article.
Friends, if you read these lines, then you have some kind of problem with the hard drive
When we think about something wrong with our hard drive?
1. It is impossible to copy the necessary information from the hard drive to another drive, while copying the operating system freezes and only the reboot saves.
2. Windows may hang unexpectedly at any stage of work.
3. It is impossible to reinstall the operating system; during the installation, Windows hangs on unpacking files or the installer reports the error "Unable to continue installation ...", or Windows installs for a very long time, for example several hours.
4. When you turn on the computer, the utility starts immediately and checks the hard disk partitions for errors.
5. The hard disk makes extraneous sounds (clicks, creaking) and is not periodically detected in the BIOS.
So, let's go, firstly, in Victoria we will precisely set the numbers of bad sectors (bad blocks), then we will make a sector-by-sector copy of the hard disk and this will save user data, and then we will hide the bad sectors of bad blocks (remap) in Victoria. We also learn how to do "Record across the meadow" (Erase test), that is, if a bad sector is detected, rewrite the entire block (256 sectors) of the hard disk with zeros.
Note: If you haven’t read, then you will not understand everything, so I recommend that you read the initial article first, then move on to this one.
You are currently reading the second article, but there are more articles:
For example, take a real hard drive with bad sectors
Friends, the minimum unit of information on the hard drive is a sector, the amount of user data is 512 bytes, if the information in the sector cannot be read, then the sector is unreadable or in other words is bad. All freezes of the operating system occur when reading information from such a sector.
This WDC WD5000AAKS-00A7B2 hard drive (500 GB capacity) is really defective,
The operating system on it constantly hangs and from time to time, when loading, the hard disk is checked for errors. The last straw for the owner of the hard drive was that it was not possible to copy important data to another disk and even reinstalling the operating system ended with another hang on unpacking Windows files, replacing the installation disk with the operating system did not work, the hang was repeated at another stage of installation.
And then the question arose of what to do with this hard drive, because one of the sections contained important data and needed to be copied.
Launch Victoria
Launch Victoria program as administrator. We agree with all warnings about working in a 64-bit system.
Select the initial tab Standard. If we have several hard disks, in the right part of the window we select the necessary hard disk with the left mouse, in our case WDC WD5000AAKS-00A7B2
and go to the SMART tab,
press the Get SMART button, the GOOD message will light up to the right of the button and S.M.A.R.T. will open. selected hard drive.
5 Reallocated Sector Count - (remap), denoting the number of reassigned sectors, this means the spare sectors on the backup tracks end and soon there will be nothing to reassign the bad sectors.
Go to the Tests tab.
Hard drive surface test in Victoria!
In the right part of the program window, select Ignor and read, then click Start. This starts a simple hard disk surface test without error correction. This test will not bring any bad or good effects on your hard drive, but when the test is over, we will find out what state our hard drive is in.
Scanning of the surface of the hard disk begins and after a while bad sectors are detected. After 40 minutes, Victoria gives us this result:
A lot of good sectors with a good reading delay of not more than 5 ms - 3815267
There are also sectors with a bad reading delay of 200 ms
There are no sectors with an unsatisfactory reading delay of more than 600 ms (candidates for bad blocks), but ...
Which is very bad, there are full bad sectors (bad blocks), information from which they could not read at all - 13!
13 bad sectors (bad blocks), they all start in the 6630400 area, and end at 980000000, that is, they are scattered throughout the hard disk. Bad block numbers need to be recorded. Friends, it is quite possible all of our problems with the hard drive may be due to these 13 bads and you need to get rid of them, but first we will make a sector-by-sector image of the sick screw.
The hard drive of the affected WDC WD5000AAKS-00A7B2 (500 GB capacity) was divided into two sections: drive D: with the operating system capacity of 120 GB and drive E: with data capacity of 345 GB.
Before working with the Victoria program, we will protect ourselves and make a full image of the E drive partition: the volume is 345 GB and we will pull the data from the image. We will create the image in another DMDE program and place it on another physical disk SAMSUNG HD403LJ (400 GB), I will show you how to do it.
Disk Management of my computer
Left click to enlarge screenshot
Important data is on the New Volume (E :) the volume of 347 GB of the WDC WD5000AAKS hard disk (total volume of 500 GB), then we will create the image of the partition (E :)
We will create a sector-by-sector image of the partition (E :) on the SAMSUNG HD403LJ hard drive (400 GB in volume), on it there is only one partition without data. New volume (F :)
The third physical disk in the system is a solid-state drive SSD (120 GB) drive (C :), it contains our working Windows 8.1 operating system, which we are now in.
Creating a sector-by-sector image of the entire hard disk or the desired partition in the DMDE program
DMDE is also a very good tool for creating sector-by-sector copies of a failed hard drive.
We go to the DMDE program website http://dmde.ru/download.html and download the program, click on the GUI for Windows.
DMDE is downloaded in the archive, unzip it and run the file dmde.exe.
Then select the language Russian.
We accept the terms of the License Agreement. In the initial window of the program, we need to select either a Physical device (that is, a completely hard disk) or a data section to create an image.
We only need the volume (E :), so left-click on our WDC WD5000AAKS hard drive, then select Logical drives
and the section (E :), then click OK.
Menu. Create image / clone ...
Place for recording, click Disk.
New volume (F :) and OK. It is necessary that the partition on which the sector-by-sector image of the faulty hard disk (or the section with unreadable data) is created should be no less than the volume of this disk.
On the new volume (F :), all data will be deleted, agree Yes.
Creation of a sector-by-sector copy of the partition (E :) of a sick WDC WD5000AAKS hard drive on a new volume (F :) of another healthy SAMSUNG HD403LJ hard drive, which lasts 6 hours (the image is removed from especially "bad" screws), and hangs tightly at 83 percent, after waiting a couple of hours, I clicked on the Abort button!
Friends, if you interrupt the creation of the image of the sector-wide section at the very end (after all, 83%), then there are two options for us, as Suvorov used to say - "either the chest in the crosses, or the head in the bushes."
After interrupting the operation, go to the New Volume (F :) and see if there is any data on it and ... it is, all the main things that we needed were the DMDE program could transfer to the dick (F :), almost all the data read without errors. So the case here is not complicated and the problems are mainly software.
But in some cases, not everything will be so rosy, and when you try to enter a section with a sector-by-sector copy, this error will be waiting for us: No access to F: \\. The file or folder is damaged. Reading is not possible.
No access to F: \\. File system not recognized. Ensure that all required system drivers are loaded and that the volume is not corrupted.
But in this case, we will not give up and will do so.
What to do if creating a sector-by-sector image fails
Friends, the process of creating a sector-by-sector copy is not always successful even after a few hours, but if you stop creating a sector-by-sector copy, the data in it may be unreadable.
Or in the process of creating a sector-by-sector copy, such an error will appear " The request was not completed due to an I / O error on the device"(see screenshot below) indicating that DMDE could not read the information in the bad sector (sector number is indicated in the error) in this case, click
“Repeat”, there will be a second attempt to read information from this sector and it may end in success. If this error with the same sector appears again, then click
"Ignore" and the creation of a sector-by-sector image will continue but we will lose information in this sector and as a result, one sector file will not open in a sector-by-sector copy. If the error "The request was not executed due to an input / output error on the device" appears too often, you can select
"Ignore everything" and similar errors will be skipped, or you can click the button
"Parameters"and appropriately configure the DMDE program for such a difficult case. Click the Options button in this window.
"Reverse", sometimes it brings a result.
And click again "Parameters".
In this window, check "- Is always". If you select the option, the operation will continue even
in case of an error related to the lack of readiness of the device. If this option is not checked, then a warning with the expected user response will be displayed on some "bad" winchesters, that is, the image will not be created on the machine.
The number of repetitions of a car with CRC - 0
Fill Bad Sectors (hex)
Then OK and OK, begins the creation of a sector-by-sector image.
Left click to enlarge image
Also workable proved this option settings.
Skip I / O Errors - Always
Do not wait if the device is not ready - Is always
CRC error retry count - 0
The number of auto retries if the sector is not found - 0
In general, I advise you to study the manual for the DMDE program http://dmde.ru/manual.html or http://dmde.ru/docs/DMDE-manual-ru.pdf, you can also wait for our article on creating a sector-by-sector image of a faulty hard disk with various programs, in it we will even consider creating a bootable flash drive with the DMDE program.
- If DMDE does not help you, then you can try other programs, for example. Of course, there are still ways with which you can make a sector-by-sector image of a bad screw, for example, boot from some Linux-based operating system, for example Ubuntu, but I won’t describe the process here and I’ll write a separate article better. Also under Linux, you can run the safecopy utility.
- What to do if you still cannot make a sector-by-sector copy of the hard drive, you should choose. You can contact a good and proven data recovery service and a sector-by-sector copy from your hard drive will be removed using special expensive equipment by specialists, for example, using the same PC-3000 complex. If you are not sorry for your data, then you can take the risk and run algorithms in Victoria that save the surface of your hard drive from bad sectors (bad blocks), as described below, the hard drive can come back to life after this operation.
- Important: Kazan(developer of the program Victoria) promises that the most innovative bad block hiding algorithm BB \u003d Advanced REMAP is NOT destructive for data, but in some cases it can be destructive for your files, since even Victoria’s most advanced algorithm Advanced REMAP hiding defects (remap), this is for any change in the translation of the screw, which means the loss of user data (details below. I want to say that sometimes it happened that Victoria will cure the hard drive from bads and you will even be able to copy the info from such a hard drive, but unfortunately not all the information It turns out readable.
So, in our case, it was possible to make a sector-by-sector copy of a diseased hard disk, namely, a new volume (E :), the DMDE program, though in some places the DMDE was a little freezing, but it ended successfully. The sector-by-sector copy of the new volume (E :) is an exact copy and is located on the volume (F :). All available data is successfully read and copied.
The main task is solved and user data is saved, now we proceed to the procedure for treating a hard disk.
How to get rid of bad sectors (bad blocks) using Victoria
Friends, let's now imagine that we did not manage to make a sector-by-sector image of the hard drive with bad blocks and we didn’t come up with anything else and decided to rid our hard of bads in the Victoria program, in the hope that after hiding bad sectors we will be able to read and copy the information to your hard drive.
Note: it is difficult to get rid of bad screws in running Windows, especially if, for example, you have a laptop with one hard drive and the operating system is installed on the same hard drive and you want to cure the same operating system from bad blocks. In such cases, create a bootable USB flash drive with Victoria, load a laptop from it and get rid of bad sectors. I propose to create a bootable USB flash drive in the next article, and now we will learn how to do it directly in a working operating system, I will demonstrate everything to you.
Remap
In the main window of Victoria, we mark the Remap item, which indicates the algorithm for reassigning bad blocks to sectors from backup tracks during the scanning process. The test is in Read mode, that is, from start to finish and click on the Start button.
We’ll talk about this while scanning.
1. What happens with this Remap algorithm? An attempt is made (several times) to force information to be written to the bad sector of the hard drive, if the attempt is successful, then the sector becomes healthy and is removed from the list of bad blocks (remap does not occur). If the recording attempt is unsuccessful, then the diseased sector is reassigned to the healthy sector with the backup track of the hard drive specially designed for such cases.
2. Remap is the reassignment (replacement) of the diseased sector, the assignment of its LBA number to another physically healthy sector from the backup track. Information from the sector (at the time of reassignment) hangs in the RAM of the screw, and as soon as the sector is reassigned, it is written back.
Remap is basically not destructive for information, if your data is lost, then only in one bad sector, but you must admit that the data in the bad block was unreadable anyway. In the second case, the data will simply be transferred to the sector from the backup track.
Result. As I said in a running Windows, it’s hard to fix anything and Victoria cannot implement Remap. After 20 minutes, the same result, 13 bad blocks, and you and I will have to make a bootable flash drive with Victoria and work in DOS.
How to scan a specific area on the hard drive in Victoria
If you know the exact addresses of bad sectors, you can set the exact scanning parameters in Victoria. For example, we know that our bad blocks start from sector 770,000,000, then in paragraph Start LBA: (carefully, in some cases your data on the hard drive will be deleted).
- Most often, software (software) troubles come across, which are removed most quickly by zeroing - the Erase algorithm, and even if the write to the sector of zeros is unsuccessful, Remap may occur, since the hard drive firmware may consider such a sector to be bad. If Erase doesn’t help, then you can choose Remap, but as we know, the chances that Remap will be made in running Windows are small.
- Soft (software) bads in some cases can be removed even by simple formatting using Windows itself. The whole difference between existing bad blocks: physical and software, read in our article. In a nutshell, I’ll explain that it is impossible to restore physical problems (a physiologically destroyed sector) (only remap, reassignment is possible), and logical (software, sector logic errors) can be restored.
- Friends, we can, but then our article will be even longer, we will do this in the next article.
I don’t feel like experimenting with our WDC WD5000AAKS hard drive, because in the next article I plan to cure it from bad blocks in DOS mode using a bootable USB flash drive with Victoria and still return the bad drive-cured hard drive with intact data to the host.
I will just show you on another hard drive how to run this test in running Windows.
In the main window of Victoria, select our hard drive and go to the Tests tab, select the Erase item (caution, in some cases your data on the hard drive will be deleted) - upon detection of an unreadable sector, forcibly rewrites the entire block of 256 sectors with zeros, of course, the information in the whole block of sectors is completely lost, but if overwriting occurs, the block returns to work (it becomes healthy).
The test is in Read mode, that is, from start to finish and click Start.
Often when "zeroing" in running Windows, these errors will appear:
Block (bad sector number) try Erase 256 sectors. It was not possible to rewrite the block of sectors.
Write Algorithm
Write mode does not look for any bad sectors, but simply immediately erases all the information on the hard disk by filling all sectors with zeros, this is in the jargon of the “Write across the meadow” repairmen, this algorithm can cure the hard disk from bads and simply bad sectors with large reading delay but nafter such a test, it will be impossible to recover data on the hard disk, so copy all important files to the portable hard disk first.