Deploying Distributed Wireless Networks (WDS) at home
Introduction
Many models of 802.11g devices can work as a bridge or WDS repeater, but, unfortunately, their configuration is not as simple as we would like. In this guide, we will look at and compare WDS with previous technologies for creating wireless bridges and give some tips to help you build WDS wireless bridges.
We’ll take a closer look at two examples that will help you figure out your settings and understand how you can use WDS. In addition, we will provide some examples of the use of "complex" WDS configurations.
Access points in this article will be called not only the access points themselves, but also wireless routers, unless otherwise stated.
WDS Technology
The term WDS stands for "Wireless Distribution System", which is supported by an increasing number of 802.11 access points. Simply put, it allows access points to establish a wireless connection between themselves, instead of using wired Ethernet channels.
WDS connections are based on MAC addresses and use a special type of frame in which all four fields for MAC addresses defined by the 802.11 standard are involved, instead of three during normal data transfer between the access point and the client.
The use of four fields of MAC addresses in a frame is the only thing that is implemented in 802.11 standards, but this turned out to be enough to implement the functions of the bridge at enterprise-level access points, that is, in expensive 802.11b models that appeared back in the late 90s of the last century. Those solutions worked at the medium access level (MAC), and the technology was developed by Choice Microsystems.
Access points with the wireless bridge function remained very expensive until about the fall of 2002, when wireless bridges became a mass device. The well-known company D-Link was the first to reduce the price of devices of this class by releasing a free firmware update to its DWL-900AP \u200b\u200b+ access point, which you can learn more about. Thanks to this update, the first low-cost product supporting the functions of a bridge and a repeater appeared on the market (see below). Other companies, following D-Link, also released similar updates, and also introduced wireless bridges as stand-alone devices, for example, Linksys WET11 [reviewed].
Although WDS was already used in these devices, nothing was mentioned about it. This situation continued until 802.11g products based on the Broadcom chipset began to appear on the market, which happened in early 2003. It was then that the term WDS began to be widely used. Broadcom included WDS support in the software, and soon 802.11g WDS-enabled access points gained popularity.
WDS can be used to implement two modes of wireless connections between access points:
- wireless bridge mode - allows access points to work only with other access points, but not with client adapters
- wireless repeater mode - allows access points to work with other access points as well as with client adapters
The disadvantages of WDS.
- The bandwidth of such a wireless connection is reduced by about half for each such connection, or "hop". This is due to the fact that during transmission and reception by all devices one channel is used, through which data is transmitted to the wired network.
- Dynamically distributed and exchanged keys are not supported on WDS connections. This means that WPA and other technologies that use dynamic key distribution are not compatible with WDS. Only static WEP keys can be used. This also applies to all clients connected through WDS access points.
: WDS technical details are beautifully described in this Proxim company document.
WDS Implementation Compatibility
As we mentioned in the previous section, there is no unified WDS specification yet, although the situation may soon change if iEEE research team formed at the beginning of this year will receive the status of a "working group" (task group). In the meantime, the concern for the compatibility of various models rests entirely with equipment manufacturers who do not make any effort so that users can build networks from equipment of various models.
As a result, manufacturers indicate in the documentation that the bridge and repeater mode will only work with equipment of the same company. And even if there is no direct indication of the problem of WDS collaboration, it will be practically impossible to get advice on the compatibility of a device from one manufacturer with a device from another!
Fortunately, many 802.11g WDS-enabled products are based on Broadcom's chipsets, which have a de facto standard for implementing WDS in their equipment. But equipment manufacturers use different interfaces.
Therefore, you cannot guarantee that devices with the WDS Wireless Bridge / Repeater function from different manufacturers will work together! In some cases, you may not be able to establish a connection, even if both devices are from the same manufacturer! This may be due to the fact that they can be produced by various OEM / ODM.
Fortunately, over time, after the release of updated firmware, the chances of successful joint work of WDS products from different manufacturers only increase. Then the different terminology used by the developers of interfaces for bridges / repeaters becomes the main obstacle. One example of dealing with such confusion is discussed below.
I would not want to repeat myself, but again we note: wDS products from different manufacturers will not necessarily work together. Therefore, it is best (and easier, from the point of view of working with technical support) to use the same model of WDS devices from the same manufacturer. If you can’t manage with one model, then you should stop at several models of the same manufacturer. The likelihood that they will work together is quite high.
Steps to Successfully Implement WDS
Before proceeding with the setup, it is necessary to carry out preparatory work so that there are no problems in the future. Below are three required and two additional steps that you are advised to go through.
- Ensure that wireless clients can connect and transmit data through all access points. Such a check is quite simple to do if you connect access points to the network via Ethernet ports. Then it will be possible to guarantee the operation of the wireless network.
- Assign a permanent IP address for each access point.. In general, this solution is quite convenient when setting up network equipment. By assigning static IP addresses, we get rid of one more potential obstacle in solving communication problems. Make sure that the assigned addresses are excluded from the range of the DHCP server, otherwise you run the risk of being in a situation where there will be two identical addresses on the network, and this is not pleasant!
- Install the same (free) channel on all access points. Since all access points in the WDS network communicate with each other, they must use the same channel. For 802.11b and 11g networks, we recommend using 1, 6, or 11 channels. In any case, you need to make sure that the channel is not used by neighboring networks. Our problems will help solve Problem Solving Guide: When Wireless Networks Interfere .
- [Optional] Set different SSIDs for access points. WDS access points establish connections based on MAC addresses, so they can work no matter what identifiers SSID set. Wireless clients, on the other hand, use an SSID when connecting. From a technical point of view, each access point in a WDS network is part of one service area (ESS) and must have the same SSID.
The roaming algorithms of most wireless clients between access points are implemented in such a way that clients do not switch from one access point to another, as long as there is at least some connection, even at the expense of speed. This feature becomes unpleasant when you add repeaters to your WLAN, and the laptop refuses to work with them!
By assigning different SSIDs to access points, you can see each of them, even using the standard WinXP utility "Zero Config", which does not display access points with the same SSID. In addition, network clients can easily switch to any access point without even knowing its MAC address.
- [Optional] Set static IP addresses for wireless clients. We noticed that sometimes dynamically obtaining a new IP address takes a lot of time. By specifying the IP settings for wireless clients statically (including the gateway address and DNS server), you will reduce the likelihood of errors when switching the client from one access point to another. In addition, you can get around the problems of transmitting DHCP requests through the bridging connections that exist on some routers.
In addition to all the above, it is necessary solve the issue of placing access points. Just like any other wireless network equipment, the speed of WDS connections depends on the signal strength. Due to the fact that each WDS bridge reduces the speed by about half, you should not reduce it even due to the location of access points too far from each other.
To choose the right places to install, you will have to try different options, but don’t think that installing the device on the edge of the existing network will give you a quick channel! A compromise here is to install a repeater where the connection speed (displayed by the utility) is 5.5 Mbps or higher for 11b and 24 Mbps or higher for 11a and 11g, i.e., approximately half the maximum distance.
Having finished preparations, you need to write down the MAC addresses of the devices and you can proceed!
MAC address collection
As we mentioned above, WDS connections work based on physical addresses. Some models allow you to use a mode that does not require the MAC addresses of each network member, but we recommend that you do not use it, but specify MAC addresses. This solution will secure the bridge (and LAN) by prohibiting the "anonymous" connection of access points to the bridge. In addition, it is likely that such a solution has a better chance of success, especially when using equipment from various manufacturers.
If you use the WinXP Wireless Zero Configuration utility, you probably know that it only displays the SSIDs of access points that are in range. The only MAC address that can be seen with it belongs to the adapter, not the access point.
The easiest way to find out the MAC addresses of network access points is to use the utility that comes with the adapter. Among the bookmarks with various parameters, you can certainly find a list of available access points and their MAC addresses. Sometimes the bookmark is called “Site Survey,” or “Networks,” as in the case NETGEAR WG511T (Fig. 1).
Conclusion
WDS technology is designed to improve the compatibility of wireless bridges and repeaters, but it does not provide it as we would like. We hope that this problem-solving guide will allow you to better understand the mechanism of WDS and help to apply it in your specific case. Let there be a connection!
Vasily Leonov,
The term WDS (Wireless Distribution System) stands for “Distributed Wireless System”. In simple terms, this technology allows access points to establish a wireless connection not only with wireless clients, but also among themselves.
Wireless networks, also called Wi-Fi or WLAN (Wireless LAN) networks, have significant advantages compared to traditional wired networks, the main of which, of course, is the ease of deployment. So, the wireless network does not need cabling (often requiring wall shredding); It’s hard to dispute the virtues of a wireless network, such as the mobility of users in its coverage area and the ease of connecting new users to it. At the same time, wireless networks at the present stage of their development are not without serious flaws. First of all, it is a low, by today's standards, connection speed, which also seriously depends on the presence of obstacles and on the distance between the receiver and the transmitter; poor scalability, as well as, when it comes to using a wireless network in the premises, a rather limited range of the network.
One of the ways to increase the range of a wireless network is to create a distributed network based on several wireless access points. When creating such networks at home, it becomes possible to turn the entire apartment into a single wireless zone and increase the connection speed regardless of the number of walls (barriers) in the apartment.
In this article, we will talk in detail about how to deploy and configure a distributed wireless network at home using two wireless access points step by step.
Choosing Wireless Equipment
There are several types of wireless standards: 802.11a, 802.11b, and 802.11g. In accordance with these standards, there are various types of equipment. The standards of wireless networks of the 802.11 family differ from each other primarily by the maximum possible transmission speed. So, the 802.11b standard implies a maximum transfer rate of up to 11 Mbps, while the 802.11a and 802.11g standards mean a maximum transfer rate of up to 54 Mbps. In addition, the 802.11b and 802.11g standards provide for the use of the same frequency range - from 2.4 to 2.4835 GHz, and the standard 802.11a implies the use of a frequency range from 5.15 to 5.35 GHz.
The equipment of the standard 802.11a, due to the frequency range it uses, is not certified in Russia. This, of course, does not interfere with its use at home. However, buying such equipment is problematic. That is why in the future we will focus on the consideration of 802.11b and 802.11g standards.
It should be noted that the 802.11g standard is fully compatible with the 802.11b standard, that is, the 802.11b standard is a subset of the 802.11g standard; therefore, clients equipped with the 802.11b standard wireless adapter can also work in wireless networks based on 802.11g standard equipment. The reverse is also true - in wireless networks based on 802.11b standard equipment, clients equipped with an 802.11b standard wireless adapter can work. However, in such mixed networks, one pitfall is hidden: if we are dealing with a mixed network, that is, with a network in which there are clients with both 802.11b wireless adapters and 802.11g wireless adapters, then all network clients will work on 802.11b protocol. Moreover, if all network clients use the same protocol, for example, 802.11b, then this network is homogeneous, and the data transfer speed in it is higher than in a mixed network, where there are both 802.11g and 802.11b clients. The fact is that 802.11b clients do not “hear” 802.11g clients. Therefore, in order to provide shared access to the data transfer medium of clients using various protocols, in such mixed networks access points must work out a certain protection mechanism. Without going into details of the implementation of these mechanisms, we only note that as a result of the application of protection mechanisms in mixed networks, the real transmission speed becomes even lower.
Therefore, when choosing equipment for a wireless home network, it is worthwhile to dwell on the equipment of one standard. The 802.11b protocol is now obsolete, and the actual data transfer rate using this standard may be unacceptably low. So the best choice is 802.11g standard equipment.
Distributed Wireless Network Architecture
The core element of any wireless network is the access point. The latter can be either a separate device or integrated into a wireless router.
As we have already noted, the main disadvantage of a wireless network based on one access point is its limited range and a pronounced dependence of the connection speed on the presence of obstacles and the distance between the access point and the wireless client of the network. If we are talking about creating a wireless network within the same room, then one access point will be quite enough. If you want to implement the task of creating a wireless network in an apartment consisting of several rooms separated by concrete walls with fittings, then one access point may be clearly not enough. Consider a typical example of a two-room apartment with concrete walls. If the access point is installed in one room, then working with this access point from the next room (in this case, the obstacle is one concrete wall) is still possible. However, the connection from the kitchen, which is separated from the room with the access point by two concrete walls, if possible, is at an unacceptably low speed.
In order to expand the range of a wireless network throughout the apartment, it is easiest to deploy a distributed wireless network based on two or more access points.
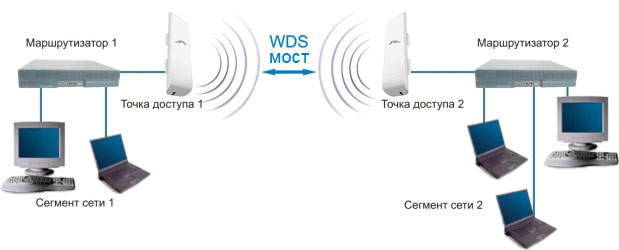
So, for example, consider the situation when in an apartment (or a small office) there are two stationary computers and one or several laptops equipped with wireless adapters, as well as two access points (AP) connected to stationary computers ( fig. 1) It is required to deploy a distributed wireless network based on two access points in order to combine the resources of all computers into a single network and, in addition, increase the connection speed between all network clients. An example showing an increase in the range of a wireless network is shown in fig. 2.
The architecture of a distributed wireless network that we have considered also has the advantage of allowing us to combine stationary PCs that are not equipped with wireless adapters into a wireless network. In this case, instead of wireless adapters, access points are used, to which stationary PCs are connected.
If we are not talking about an apartment, but about a small office, then wired network segments can act as PC # 1 and PC # 2 computers. Then two access points operating in the wireless bridging mode allow you to connect two wireless network segments to each other wirelessly.
So, after the architecture of the distributed wireless network is defined, consider an example of its practical implementation. However, before proceeding to the consideration of specific settings for access points, it is necessary to decide which access points are needed so that they can be used to create a distributed wireless network.
WDS Technology
The term WDS (Wireless Distribution System) stands for “Distributed Wireless System”. This technology is supported by most modern access points. In simple terms, this technology allows access points to establish a wireless connection not only with wireless clients, but also among themselves.
WDS connections are based on MAC addresses and use a special type of frame in which all four fields for MAC addresses defined by the 802.11 standard are used, instead of three, as with normal data transfer between the access point and the client. Recall that in the interaction of clients with the access point, the header of each frame contains the MAC addresses of the sending node, the receiving node, and the access point itself. In the case of using WDS technology, in each frame, in addition to the MAC address of the sending and receiving nodes, the MAC addresses of the access point associated with the node and the access point interacting with it are also inserted.
WDS technology can be used to implement two modes of wireless connections between access points: wireless bridge mode (radio bridge) and wireless repeater mode.
Wireless bridge mode allows access points to work only with other access points, but not with client adapters. The wireless repeater mode allows access points to work with both other access points and client adapters.
It is clear that the architecture of a distributed wireless network under consideration implies the functioning of both access points in the wireless repeater mode.
Pitfalls of WDS Technology
Despite the apparent advantages of WDS technology, there are pitfalls here, among which are the following:
- decrease in connection speed in WDS network;
- inability to use WPA data encryption;
- compatibility problem of equipment from different manufacturers.
A decrease in the wireless connection speed when implementing WDS technology is due to the fact that all access points use the same communication channel, therefore, the more wireless access points used in the network in the repeater or bridge mode, the lower the wireless client connection speed in such network.
Another disadvantage of the WDS network is that it does not support user authentication and data encryption technologies based on dynamic keys. Only static keys are supported. That is, the only technology supported by WDS networks is WEP encryption, which, as you know, is less secure compared to WPA encryption.
Well, the last problem of WDS networks is the problem of compatibility of equipment from different manufacturers. The fact is that at the moment there is no single WDS specification, which causes a certain problem when using devices from different manufacturers.
Of course, if access points based on the same chipsets are used to create a distributed network, the question of equipment incompatibility does not exist. However, in most cases, information about the chipset on which the access point is built is not available to the user. Therefore, the only 100% guarantee of equipment compatibility is the use of the same access points for deploying a WDS network. Also, there is a high probability of equipment compatibility when using access points of the same manufacturer (even if they are different models). Regarding the compatibility of access points of different manufacturers, the question remains open (although, of course, this does not mean that access points of different manufacturers will be incompatible with each other).
Configure Access Points
To deploy a distributed wireless network based on two access points that support WDS technology, you must first configure two wireless networks individually. Actually, the process of setting up each wireless network is to configure two separate access points.
We will look at the process of configuring access points integrated into the Gigabyte GN-B49G and Gigabyte GN-BR01G wireless routers. It is assumed that all computers included in the wireless network use the Windows XP Professional SP3 operating system (English version).
To configure the access point, the first thing you need to find out is the IP address of the access point, login and password, set by default. Any access point or router, being a network device, has its own network address (IP address).
In the vast majority of cases, by default, the IP address of the access point is 192.168.1.254, or 192.168.1.1, or 192.168.0.254, or 192.168.0.1, as for the login and password, then, as a rule, by default, the user's login is “ admin ”, and the password is either not set, or it’s the same“ admin ”. In any case, the IP address and password are indicated in the user manual.
Assume that the default IP address of the access point is 192.168.1.254 (common to all Gigabyte access points).
Next, each access point must be connected to a computer using the traditional Ethernet network interface (for this, Ethernet network controllers must be installed on computers). In the case of using wireless routers, the computer is connected via the LAN port of the router.
To configure access points, it is necessary that the computer to which the access point is connected and the access point itself have IP addresses that belong to the same subnet. Since in our case both access points have a default IP address of 192.168.1.254, then the computers that connect these access points must be assigned static IP addresses 192.168.1.x (for example, 192.168.1.100) with a subnet mask of 255.255. 255.0. Of course, computers should be assigned different IP addresses.
|
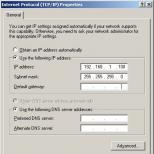
To assign a static IP address to a computer, right-click on the My Network Places icon and select Properties from the list that opens. In the Network Connection window that opens, select the Local Area Connection icon and, right-clicking on it, go to step Properties. After that, the Local Area Connection Properties dialog box should open, allowing you to configure the network adapter. Tab General Highlight Internet Protocol (TCP / IP) and click on the Properties button. You will see a dialog box that allows you to set the IP address of the computer and the subnet mask. In this dialog box, select Use the following IP address: and enter the IP address and subnet mask in the corresponding text boxes ( fig. 3).
|

After you set a static IP address for your computer, you can directly access the settings of the access point itself. To do this, in the address field of the Web browser, enter the IP address of the access point (192.168.1.254). If everything is done correctly, then you will see a dialog box for the settings of the access point (router) (you will first need to enter a username and password). When configuring access points, it is recommended to disable the Firewall built into the Windows XP operating system.
Using the settings dialog box, you can change the IP address of the access point, as well as configure the wireless network. Since in our case two access points are used, it is necessary that they have different IP addresses, but within the same subnet. In our case, for the first access point, we used the default IP address (that is, 192.168.1.254), and for the second - 192.168.1.250.
To configure a wireless network, you need to set the following parameters:
- Type of wireless network. If the access point supports several wireless standards, you must explicitly specify the wireless network standard (for example, 802.11g).
- Channel number. Various frequency channels can be used to wirelessly connect the access point to network clients. For example, in the case of the 802.11g protocol, channels one through thirteen may be used. You can explicitly specify which channel will be used to establish a connection, or you can set automatic channel select (Enable auto channel select). To implement a distributed wireless network, it is necessary that both access points support the same communication channel, so at both access points it is necessary to select the same communication channel, for example, 6.
- SSID Each wireless network has its own unique SSID, which is the code name for the wireless network. In our case, we used the SSID for the access point, that is, for one network - B49G, and for the second - BR01G.
- Rate The access point allows you to explicitly specify the speed of the established connection. However, this is not recommended and it is best to set the connection speed to be automatically detected (auto / best).
- Hide SSID. To increase the security of the wireless connection, almost all modern access points support the hidden identifier mode. When this function is activated, the user scanning the air for wireless networks will not see the SSID of the existing wireless network. When setting up the wireless network for the first time, you should not activate this mode.
So, after all the basic settings of the access point are done, you can proceed to the settings of the wireless adapters on the network clients.
Configure Wireless Adapters
Setting up a specific wireless adapter, of course, depends on the version of the driver and management utility used. However, the configuration principles themselves remain unchanged for all types of adapters. Considering the popularity of laptops based on Intel Centrino mobile technology, an integral part of which is the presence of a wireless module, we will describe the wireless settings using the Intel PROSet / Wireless driver (version 9.0.1.59) used in laptops based on Intel Centrino technology.
So, first of all, you need to set a static IP address for the wireless adapter so that it belongs to the same subnet as the access points and computers to which they are connected. In our case, this is the IP address 192.168.1.x with a subnet mask of 255.255.255.0.
Next, you need to configure the wireless adapter. In the case of a laptop based on Intel Centrino mobile technology, open the Intel PROSet / Wireless dialog box (the icon of this window is in the system tray), with which a new wireless connection profile will be created.
Click the Add button to create a profile for the new wireless connection. In the opened dialog box Create a wireless network profile ( fig. 4) enter the profile name (for example, B49G) and the wireless network name (SSID) that was set when configuring the access point (B49G or BR01G).
Since in our case we are talking about creating two wireless networks, on the wireless client (laptop) you need to create two profiles of wireless connections for each wireless network (for the network with the identifier BR01G and B49G)
After creating wireless profiles, the wireless client (laptop) must establish a connection with each of the two access points. The settings of all PCs and access points are shown on fig. 5.
Many models of 802.11g devices can work as a bridge or WDS repeater, but, unfortunately, their configuration is not as simple as we would like. In this guide, we will look at and compare WDS with previous technologies for creating wireless bridges and give some tips to help you build WDS wireless bridges. We’ll take a closer look at two examples that will help you figure out your settings and understand how you can use WDS. In addition, we will provide some examples of the use of "complex" WDS configurations.
Note: Access points in this article will be called not only the access points themselves, but also wireless routers, unless stated otherwise.
WDS Technology
The term WDS stands for "Wireless Distribution System", which is supported by an increasing number of 802.11 access points. Simply put, it allows access points to establish a wireless connection between themselves, instead of using wired Ethernet channels. WDS connections are based on MAC addresses and use a special type of frame in which all four fields for MAC addresses defined by the 802.11 standard are used, instead of three during normal data transfer between the access point and the client. The use of four fields of MAC addresses in the frame is the only one that is implemented in 802.11 standards, but this turned out to be enough to implement the bridge functions at access points.
Access points with the wireless bridge function remained very expensive until about the fall of 2002, when wireless bridges became a mass device. The well-known company D-Link was the first to reduce the price of devices of this class by releasing a free firmware update to its DWL-900AP \u200b\u200b+ access point. Thanks to this update, the first low-cost product supporting the functions of a bridge and a repeater appeared on the market. Other companies, following D-Link, also released similar updates, and also introduced wireless bridges as standalone devices, for example, Linksys WET11
Although WDS was already used in these devices, nothing was mentioned about it. This situation continued until 802.11g products based on the Broadcom chipset began to appear on the market, which happened in early 2003. It was then that the term WDS began to be widely used. Broadcom included WDS support in the software, and soon 802.11g WDS-enabled access points gained popularity.
WDS can be used to implement two modes of wireless connections between access points:
1. wireless bridge mode - allows access points to work only with other access points, but not with client adapters
2. wireless repeater mode - allows access points to work with both other access points and client adapters
WDS disadvantages
The bandwidth of such a wireless connection is reduced by about half for each such connection, or "hop". This is due to the fact that during transmission and reception by all devices one channel is used, through which data is transmitted to the wired network.
Dynamically distributed and exchanged keys are not supported on WDS connections. This means that WPA and other technologies that use dynamic key distribution are not compatible with WDS. Only static WEP keys can be used. This also applies to all clients connected through WDS access points.
Tip: WDS technical details are beautifully described in this Proxim document.
WDS Implementation Compatibility
As we mentioned in the previous section, there is no unified WDS specification yet, although the situation may soon change if the IEEE research group formed earlier this year receives the status of a “task group”. In the meantime, the concern for the compatibility of various models rests entirely with equipment manufacturers who do not make any effort so that users can build networks from equipment of various models. As a result, manufacturers indicate in the documentation that the bridge and repeater mode will only work with equipment of the same company. And even if there is no direct indication of the problem of WDS collaboration, it will be practically impossible to get advice on the compatibility of a device from one manufacturer with a device from another!
Fortunately, many 802.11g WDS-enabled products are based on Broadcom's chipsets, which have a de facto standard for implementing WDS in their equipment. But equipment manufacturers use different interfaces. Therefore, you cannot guarantee that devices with the WDS Wireless Bridge / Repeater function from different manufacturers will work together! In some cases, you may not be able to establish a connection, even if both devices are from the same manufacturer! This may be due to the fact that they can be produced by various OEM / ODM. Fortunately, over time, after the release of updated firmware, the chances of successful joint work of WDS products from different manufacturers only increase. Then the different terminology used by the developers of interfaces for bridges / repeaters becomes the main obstacle. One example of dealing with such confusion is discussed below.
Note: I would not want to repeat it, but note again: WDS products from different manufacturers will not necessarily work together. Therefore, it is best (and easier, from the point of view of working with technical support) to use the same model of WDS devices from the same manufacturer. If you can’t manage with one model, then you should stop at several models of the same manufacturer. The likelihood that they will work together is quite high.
Steps to Successfully Implement WDS
Before proceeding with the setup, it is necessary to carry out preparatory work so that there are no problems in the future. Below are three required and two additional steps that you are advised to go through.
1. Ensure that wireless clients can connect and transmit data through all access points. Such a check is quite simple to do if you connect access points to the network via Ethernet ports. Then it will be possible to guarantee the operation of the wireless network.
Set a constant IP address for each access point. In general, this solution is quite convenient when setting up network equipment.
2. By assigning static IP addresses, we get rid of one more potential obstacle in solving communication problems. Make sure that the assigned addresses are excluded from the range of the DHCP server, otherwise you run the risk of being in a situation where there will be two identical addresses on the network, and this is not pleasant!
3. Install the same (free) channel on all access points. Since all access points in the WDS network transmit data among themselves, they must use the same channel. For 802.11b and 11g networks, we recommend using 1, 6, or 11 channels. In any case, you need to make sure that the channel is not used by neighboring networks.
4. Set different SSIDs for access points. WDS access points establish connections based on MAC addresses, so they can work regardless of which SSIDs are specified. Wireless clients, on the other hand, use an SSID when connecting. From a technical point of view, each access point in the WDS network is part of one service area (ESS) and must have the same SSID.
The roaming algorithms of most wireless clients between access points are implemented in such a way that clients do not switch from one access point to another, as long as there is at least some connection, even at the expense of speed. This feature becomes unpleasant when you add repeaters to your WLAN, and the laptop refuses to work with them!
By assigning different SSIDs to access points, you can see each of them, even using the standard WinXP utility "Zero Config", which does not display access points with the same SSID. In addition, network clients can easily switch to any access point without even knowing its MAC address.
5. Set static IP addresses for wireless clients. We noticed that sometimes dynamically obtaining a new IP address takes a lot of time. By specifying the IP settings for wireless clients statically (including the gateway address and DNS server), you will reduce the likelihood of errors when switching the client from one access point to another. In addition, you can get around the problems of transmitting DHCP requests through the bridging connections that exist on some routers.
In addition to everything written above, it is necessary to solve the issue of the placement of access points. Just like any other wireless network equipment, the speed of WDS connections depends on the signal strength. Due to the fact that each WDS bridge reduces the speed by about half, you should not reduce it even due to the location of access points too far from each other.
To choose the right places to install, you will have to try different options, but don’t think that installing the device on the edge of the existing network will give you a quick channel! A compromise here is to install a repeater where the connection speed (displayed by the utility) is 5.5 Mbps or higher for 11b and 24 Mbps or higher for 11a and 11g, i.e., approximately half the maximum distance.
Having finished preparations, you need to write down the MAC addresses of the devices and you can proceed!
MAC address collection
As we mentioned above, WDS connections work based on physical addresses. Some models allow you to use a mode that does not require specifying the MAC addresses of each network member, but we recommend that you do not use it, but specify MAC addresses. This solution will secure the bridge (and LAN) by prohibiting the "anonymous" connection of access points to the bridge. In addition, it is likely that such a solution has a better chance of success, especially when using equipment from various manufacturers.
If you use the WinXP Wireless Zero Configuration utility, you probably know that it only displays the SSIDs of access points that are in range. The only MAC address that can be seen with it belongs to the adapter, not the access point.
The easiest way to find out the MAC addresses of network access points is to use the utility that comes with the adapter. Among the bookmarks with various parameters, you can certainly find a list of available access points and their MAC addresses. Sometimes the bookmark is called “Site Survey,” or “Networks,” as in the case of NETGEAR WG511T (Figure 1).
If the client utility does not allow viewing MAC addresses, then you can use the access point administration interface. It is worth paying attention to the moment that some models display two MAC addresses: for wired and wireless interfaces. If this is the case in your case, then be sure to write down the MAC address of the wireless interface.
Recall that in the properties of the TCP / IP protocol, network addresses from the same subnet where the access point is located must be recorded:

In the DWL-2100AP access point, it is possible to scan the range to find nearby access points:
We go to the device for this by entering its ip in the browser line (default is 192.168.0.50 Login admin Password admin)  Go to the Wirless tab, select the WirelessClient mode, click Scan:
On the air broadcast 3 access points, two of which support WDS mode.
We copy the MAC addresses of the access points with which you need to create a bridge (ring topology) to the clipboard and write to notepad.
Select Mode: WDSwithAP and copy the MAC addresses of the remote access points to the cells.
Select SuerGMode in SuperGwithDinamicTurbo, this will increase the speed by 20%.
 Click Apply to reload the access point and save the changes.
The operation must be repeated on each of the three access points: 
Similarly, we configure the second access point:

We configure the third access point, similarly entering the MAC addresses of the two previous ones in the fields
After rebooting the third access point, the bridge is completed.
Verify WDS Connection
How to check if the WDS connection is working? If both access points are connected to the switch, then the Link and Activity indicators on your switch and both access points will blink actively. Don’t be afraid, everything is fine, this indicates a double connection (two MAC addresses correspond to one IP address) between access points via wired Ethernet and WDS.
As soon as you disconnect the Ethernet cable from the remote access point, the flashing will stop. Now you can leave the access points, start the command line (MS-DOS session) and send a ping request to the IP address of the remote access point (in our example, 192.168.0.13). If the WDS connection is working, then you will receive a series of ping ping echoes. WDS connection works!
Now it's time to use a laptop with a wireless adapter. Make sure that the names of both access points are visible in the list of available networks, try connecting to each of them in turn. (Now it’s clear why you need to set different SSIDs?)
If everything works, then you can turn off the remote access point and set it to the desired location. Then connect the power, wait for it to load, and repeat the tests. Congratulations! You have just increased the range of your wireless network!
Possible malfunctions
If, when sending a ping request, you receive an excess of the waiting interval, then repeat the request after a while. We noticed that some router models did not establish a connection for a long time (up to one minute) after loading.
If there is no connection, then once again make sure the correct settings of both access points. In particular, verify that the access points have the MAC addresses of the opposite ends of the WDS connection. Also make sure that the addresses themselves are correct. It is not necessary to worry about the fact that zero can be a beech "O" and vice versa: only numbers and letters from A to F are used in MAC addresses. However, we confused the letter B with the eight a couple of times.
Then try turning on / off the power of the access points. Turn off both, then turn on the connected to the LAN, wait until it is ready for operation. Then turn on the other and wait until it is also ready to go. Now you can run the ping request again, just make sure enough time has passed.
Star
There are three ways to configure WDS access point connections. In Fig. The Star topology is shown in which one access point establishes a channel from each of the four remote access points, each of which has a channel to the "root" (connected to the LAN) access point.

This configuration is preferable to the chain considered in the second example, it allows you to create a large network coverage area with one intermediate wireless channel to each repeater. However, its main drawback is that connecting remote access points to the LAN depends on the operation of the "root" access point (building 1). To create a minimal Star configuration, three access points are required.
Ring

And, in conclusion, in Fig. 11 shows a loop configuration of a WDS in which each access point has a WDS connection with two others. Although this configuration also has a single point of failure, it is still more reliable. If one of the access points, except # 1, becomes faulty, the connection of the others with the wired LAN segment will not be broken.
This configuration should not be used unless you are sure that all access points used support the spanning tree algorithm and protocol. If the devices do not support the spanning tree, then the network speed will drop dramatically due to broadcast storms broadcast storms.
Tire
A bus topology, by its very structure, presupposes the identity of the network equipment of computers, as well as the equal rights of all subscribers.

There is no central subscriber through which all information is transmitted, which increases its reliability (in fact, if any center fails, the entire system managed by this center ceases to function). Adding new subscribers to the bus is quite simple. It is necessary to enter the parameters of the new access point, which will only lead to a short-term reboot of the last point.
The bus is not afraid of failures of individual points, since all other computers on the network can normally continue to exchange among themselves, but at the same time, the rest of the computers will not be able to access the Internet.
Conclusion
WDS technology is designed to improve the compatibility of wireless bridges and repeaters, but it does not provide it as we would like. We hope that this problem-solving guide will allow you to better understand the mechanism of WDS and help to apply it in your specific case. Let there be a connection!
Purpose of technology WDS
Wireless Distribution System (WDS) Is a wireless technology that can be used to solve the following tasks:
- Wi-Fi network coverage extension By combining multiple Wi-Fi hotspots into one network. In this case, the Wi-Fi points do not need to be connected with each other by a cable, they work in the repeater (repeater) mode and transmit data via Wi-Fi between themselves and client Wi-Fi adapters;
- Combining wired network segments over Wi-Fi into a single local network. In this case, a Wi-Fi bridge is created between the wireless access points. In this mode, client adapters cannot connect to Wi-Fi access points via Wi-Fi.
Let's see how to configure Ubiquiti equipment to use WDS technology.
Extend your Wi-Fi network with Ubiquiti access points
Using WDS technology, you can amplify a Wi-Fi signal to the desired point, increase the range of Wi-Fi coverage, expand Wi-Fi coverage of the network, and bypass obstacles.

In our example, we will expand the Wi-Fi network using access points NanoStation M2 and NanoStation M2 Loco.
If you use Ubiquiti M-series devices, and your subscribers are equipment from a different manufacturer, be sure to turn off AirMax technology on the first tab.
To disable Ubiquiti proprietary technology Airmax do the following:
- go to the first tab with the Ubiquiti logo;
- in field airMAX: uncheck Enable;
- press the button Change to change the settings;
- press the button Apply at the top of the page to apply the settings.

Configure the first WDS access point
Open the tab WIRELESS

- in the list Wireless Mode: select mode Acces point wds (WDS access point). In AirOS 5.5 firmware you need to select the mode AP-Repeater;
- in field WDS Peers: prescribe the MAC address of the second WDS access point. To find out the MAC address of the second access point, you need to go to its settings on the tab MAIN and in the field WLAN MAC look at the MAC address.
- in field SSID
- in the list Country Code: choose your country Ukraine (or another);
- in the list Channel Width: choose the channel width 20 MHz, because not all client Wi-Fi Adapters support 40MHz channel width;
- in the list Frequency, Mhz: we select at what frequency the access point will work. In this field, the same frequency value should be selected on the first and second access point;
- in the list Security: choose the type of encryption WEP
- in field WPA Key specify a password of 10 characters to access the Wi-Fi point;
- Change;
- Apply;
Go to the tab NETWORK

- in the list Network Mode: select mode Bridge (bridge);
- in field Bridge ip Static DHCP DHCP;
- press the button Change to change the settings;
- to apply the settings at the top of the page, click Apply.
Configure a Second WDS Access Point
Open the tab WIRELESS and configure the parameters of the first WDS Ubiquiti access point:

- since the second point we have installed AirOS 5.5 firmware, in the list Wireless Mode: select mode AP-Repeater (access point - repeater). In AirOS 5.3 firmware you need to select the mode Acces point wds;
- in field WDS Peers: register the MAC address of the first WDS access point. To find out the MAC address of the first access point, you need to go to its settings on the tab MAIN and in the field WLAN MAC look at the MAC address.
- in field SSID: write the name of the first Wi-Fi access point;
- in the list Country Code: choose your country Ukraine (or another);
- in the list Channel Width: choose the channel width 20 MHz, since not all client Wi-Fi adapters support 40MHz channel width;
- in the list Frequency, Mhz: we select at what frequency the first access point works. In this field, the same frequency value should be selected on the first and second access point;
- in the list Security: choose the type of encryption WEP, because in WDS repeater mode other types of encryption are not supported;
- in field WPA Key specify a password of 10 characters to access the Wi-Fi point. The password must be the same on the first and second access points;
- to change the settings, press the button Change;
- to apply the settings at the top of the page, click Apply.
Check that the WDS access points are connected to each other and are working in repeater (repeater) mode.
Go to the tab on each of the points MAIN and choose Stations. The MAC address of the connected Wi-Fi Ubiquiti access point should be displayed in the list.


Configure the network settings of the second WDS Ubiquiti access point. Go to the tab NETWORK and configure:

- in the list Network Mode: select mode Bridge (bridge);
- in field Bridge ipwe select how the access point will receive network settings. Static - settings are entered manually DHCP - The access point receives network settings automatically from the DHCP server. Our network has a DHCP server, so we chose DHCP;
- press the button Change to change the settings;
- to apply the settings at the top of the page, click Apply.
After applying the settings, the DHCP server will assign the WDS Ubiquiti access point a new IP address. Therefore, you cannot enter the access point settings by the old IP address. The utility will help you find the new IP address of Ubiquiti.
Connecting Wi-Fi Client Adapters to WDS Access Points
Connecting a laptop to a WDS access point is no different from a regular connection to a Wi-Fi access point. We click on the wireless network management icon in the lower right corner of the screen, select our Wi-Fi point and click the "Connect" button.

In the next window, enter the password to access the Wi-Fi network.

After that, you should connect to the Wi-Fi network.
Now you can go to the settings of the access points on the tab MAIN to choose Stations and view a list of connected clients.
If the client Wi-Fi device falls into the coverage area of \u200b\u200bboth WDS Ubiquiti access points, then it will connect to the access point that will have the best level of Wi-Fi signal.


Create WDS Ubiquiti Bridge
Combine two wired network segments into a single local network using the NanoStation M5 and NanoStation M5 Loco access points. NanoStation M5 will operate as a WDS access point, and NanoStation M5 Loco as a WDS client.
Configure WDS Access Point
Open the tab WIRELESS and configure the WDS settings of the access point:

- in the list Wireless Mode: select mode Acces point wds (WDS access point);
- in field SSID: prescribe the name of the Wi-Fi access point;
- in the list Country Code: choose your country Ukraine (or another country);
- in the list Frequency, Mhz: we choose at what frequency the access point will work (you can leave Auto);
- in the list Security: choose the type of encryption. For greater security, encryption is best. WPA2-AES;
- in field WPA Preshared Key
- press the button Change to save the settings;
- to apply the settings at the top of the page, click the Apply button;
Go to the tab NETWORK and configure the network settings:

- in the list Network Mode: select mode Bridge (bridge);
- in field Bridge ipwe select how the access point will receive network settings. Static - settings are entered manually DHCP - The access point receives network settings automatically from the DHCP server. Our network has a DHCP server, so we chose DHCP;
- press the button Change to save the settings;
- to apply the settings at the top of the page, click Apply;
After applying the settings, the DHCP server will assign the WDS Ubiquiti access point a new IP address. Therefore, you cannot enter the access point settings by the old IP address. The utility will help you find the new IP address of Ubiquiti.
Configure WDS Client
Connect to the WDS access point. To do this, open the tab WIRELESS and configure the WDS client settings:


- in the list Wireless Mode: select mode Station wds(WDS client);
- press the button Select ... to search for wireless networks;
- in a new window, the found Wi-Fi networks will be displayed. We select the necessary network and press the button Lock to AP;
- now configure the security settings. In the list Security: choose the type of encryption used on the Wi-Fi point to which you are connecting;
- in field WPA Preshared Key specify the password to access the Wi-Fi point;
- press the button Change to save the settings;
- to apply the settings at the top of the page, click Apply;
Check that the WDS client is connected to the WDS access point. To do this, go to the tab MAIN and see the connection settings.

Now configure the network settings. To do this, go to the tab NETWORK and configure:

- in the list Network Mode: select mode Bridge (bridge);
- in field Bridge ipwe select how the access point will receive network settings. Static - settings are entered manually DHCP - The access point receives network settings automatically from the DHCP server. Our network has a DHCP server, so we chose DHCP;
- press the button Change to save the settings;
- to apply the settings at the top of the page, click Apply;
After applying the settings, the DHCP server will assign the WDS Ubiquiti client a new IP address. Therefore, you will not enter the access point settings for the old IP address. The utility will help you find the new IP address of the Ubiquiti access point.
Finding Ubiquiti IP Address on a LAN
To find the new IP address of the Ubiquiti access point that was assigned by the DHCP server, we need a utility Device discovery tool.
Download the utility from the following link Device Discovery Tool. For the utility to work, you will need Java, it can be downloaded from www.java.com.
After starting the utility will find the IP addresses of all Ubiquiti devices.

If your devices receive network settings from a DHCP server, be sure to configure your computer’s network card to receive automatic settings.
Article Reviews
Rating: 5 Votes:
Andrey 03/29/2017 20:56:39
Good afternoon. Please tell me, I connected an access point of nanostructure of m 5 in the city and two clients also of nanostructure of m 5. And when two clients are working on a load (well, they are downloading something), one of the Internet disconnects. In short, in turn, what did I configure incorrectly?
Reply Cancel reply
Dima 03/30/2017 10:10:32
Set speed limits on points.
Reply Cancel reply
Andrey 03/30/2017 11:50:59
and how to do it?
Reply Cancel reply
Dima 03/30/2017 16:33:39
Reply Cancel reply
Oleg 01/12/2017 11:35:25
beauties! everything is accessible and understandable! guys such a question: there is nanastation m2 and huawei mobile wifi router. is it possible and how, if possible, to take a wifi signal from a router to amplify it and distribute it from a nanostation? thanks!
Reply Cancel reply
Support 12.01.2017 12:45:55
Reply Cancel reply
Oleg 01/12/2017 18:26:54
Guys here in this and a chip !!! The router is mobile, that is, it has micro usb and that's it. It is connected to a 5 volt charger. The nanowire has 24 volts of power and a power socket. But fate doesn’t succeed in smacking? I’ve set up Nana, she sees and receives the router and the Internet. And how to make her distribute now? I thought the airmax does not give, but in the settings I do not even have a disable button!
Reply Cancel reply
Technical Support 01/13/2017 16:31:37
If your mobile router has a WDS function, try to configure both devices as WDS access points.
Reply Cancel reply
Natalya 10/31/2016 13:30:05
I really liked the article. Thanks. My question is: is it possible to configure a bridge between Nanostation M5 and Rocket M5 with a circular antenna, using them as two access points. Nanostation is connected to the Internet. It is necessary to go around the obstacle. Or do you need two Rocket or two Nano-Better to be better? How the access point and client are configured perfectly, but as two access points-repeaters - it does not work. Nanostation has version 5.6, and Rocket has 5.5
Reply Cancel reply
Dima 10/31/2016 15:10:02
It’s possible, only it makes no sense, because nanostation has a directional antenna and will normally broadcast only in one direction.
The obstacle can be circled like this:
Nanostation (client) - Rocket (access point on an obstacle) - Nanostation (client)
or so
Nanostation (access point) - Nanostation (client on an obstacle) - network cable - Nanostation (access point on an obstacle) - Nanostation (client)
Reply Cancel reply
Natalia 11/01/2016 10:03:36
I have access to the Internet only at the first point. So this will not work: Nanostation (access point-repeater) - Rocket (access point-repeater on an obstacle) - Nanostation (client)?
Reply Cancel reply
Dima 11/01/2016 12:13:31
Is Nanostation connected directly to the provider or through a router?
Reply Cancel reply
Natalia 11/01/2016 12:30:10
Through the router.
Reply Cancel reply
Dima 11/01/2016 12:37:09
Then no matter where the Internet is. On all devices, you set the network mode to Bridge and static IP. They will all be located on the same network and the router will distribute IP addresses to clients. Everything will work according to the Router - Nanostation (client) - Rocket (access point on an obstacle) - Nanostation (client) scheme.
You can also configure according to the scheme Nanostation (access point-repeater) - Rocket (access point-repeater on an obstacle) - Nanostation (client), but in repeater mode the speed will be less.
Reply Cancel reply
Natalya 02.11.2016 11:50:17
Thank you very much for your help!!!
Reply Cancel reply
Natalia 12/02/2016 15:35:11
Hello, another question to this topic. At my first point is the Nano-Station Loko M5. According to its characteristics, it has a range of up to 2 km, and in fact I barely take 350 meters to the second point. The signal strength is only 26%. There is, however, a pair of poplars on the way. The better to replace it, tell me, please.
Reply Cancel reply
Dima 12/02/2016 19:38:58
Better to put AirGrid M5 27 - speed up to 50 Mbps or
PowerBeam M5-400 - speeds up to 90 Mbps.
Reply Cancel reply
Natalia 12/08/2016 11:32:39
Will AirGrid be friends with Rocket and what is its coverage angle and distance? I did not find in the characteristics.
Reply Cancel reply
Technical Support 12/08/2016 14:40:43
AirGrid will be friends with Rocket. The coverage angle and distance depends on which AirGrid and which antenna is installed on the Rocket.
Reply Cancel reply
Natalia 12/08/2016 19:36:49
AirGrid M5 and Rocket M5 + AirMax Omni 5G-13
Reply Cancel reply
Technical Support 12/09/2016 10:24:59
AirGrid M5 23 can be safely set up to 4 km.
Reply Cancel reply