How to find the plugin. Browser Plugins - plug-ins in Yandex browser
Web browser plug-ins are special plug-ins that enhance the capabilities of the software. Among these elements, we can distinguish the most famous: Adobe Flash Player, Chrome PDG Viewer and many others. Fortunately, the developers of the Internet browser have provided the ability to add and remove plugins, respectively, everyone can independently manage them: update, install, uninstall.
Most elements such as plugins must be present, as they ensure the correct display of some elements on web resources.
Each user of a web browser can independently see a list of installed modules. This can be done in several possible ways:
- Type chrome: // plugins in the address bar of your web browser.
- Use the button in the upper right corner and enter the "Settings" section.
In the second case, you will need to expand “Advanced Settings”. 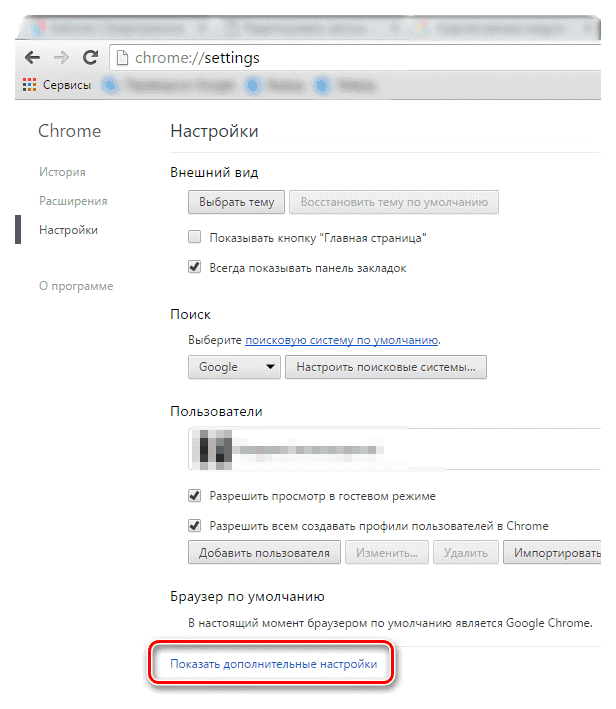
Click on the “Content Settings” option.
 The “Plugins” block will appear in the list, where you want to select “Manage individual plugins”.
 In both cases, a window with preloaded Google Chrome browser plugins will be displayed. Most of them are built-in, so removing them is not possible. Nevertheless, if necessary, the user can independently turn them off, for which it is enough just to click on the appropriate button.
 Also, the interface has the ability to automatically run the selected plugins. To do this, check the box in the section with the selected plugin, opposite the inscription: "Always run."
For installing additional, new browser plug-ins, you need to update it to the latest version, for example, if you think that you are missing one of them. The fact is that Google itself is responsible for adding them.
How to enable and disable plugins?
By default, all installed modules are active.
Actually, this is what the “Disable” button says in the plugin section. It should be noted that you need to deactivate them only if they do not work correctly, or you do not need them.
 Disabling some modules allows you to slightly increase productivity, browser speed, so users often resort to these manipulations. However, this may be required only when using outdated personal computers or laptops.
In addition to disabling and enabling modules, it is possible to update them. This is most appropriate in cases where you want to achieve maximum safety performance. At the same time, the user himself will not have to do anything, since the Google Chrome web browser automatically updates the plugins to the latest version when a new version appears.
When an update appears, chrome will independently check for module updates and install them. If for some reason you doubt the relevance of your browser, you can check for new updates yourself, it’s enough:
- Open the program and in the upper right corner click on the image of three points.
- In the list, select the "Help" option and click "About Google Chrome."
- The program will automatically check for updates.
A window will display how current the version is on your personal computer. If the latest build is being used, a daw will be shown indicating that the latest version is being used. Otherwise, you will be advised to install it.
If, upon completion of this check, new versions of modules are found, they will be installed automatically. The developers of the Google Chrome browser took care of their users and did everything possible to minimize their efforts to update.
Finally, it is necessary to say that the following types of modules can be installed and used in the browser:
- Adobe Flash Player
- Microsoft Silverlight
- Adobe PDF
- Quick Time and many others.
Nevertheless, it is advisable to regularly check this list, since when installing various kinds of software there is a possibility that not the safest types of plug-ins will be installed together with this. These include:
- Picasa;
- ICQ and others
If they appear, immediately turn off and check your web browser for malicious software to avoid negative consequences in the future.
Work with the Internet rarely does without the usual browser. With it, we go to your favorite sites, browse media content, communicate with people we talk to and download the files we need. At the same time, plugins, special program blocks that significantly expand the functionality of our navigator, occupy an important place in the work of such a browser. In this article, I will share the specifics of the plug-ins in Yandex.Browser, and also tell you how to access the plug-ins in Yandex browser using the browser: // plugins command.
How to open plugins page in Yandex browser - browser plugins
To gain access to the plugins of our Yandex browser, just start it and enter the command in its address bar:
browser: // plugins
You will see a list of plugins installed on your browser.

The classic set of plugins in Yandex.Browser
Initially, they are presented by browser: // plugins in a rather compact form, therefore, to display the full display of their characteristics, you must click on the plus sign next to the “Details” sign on the right.
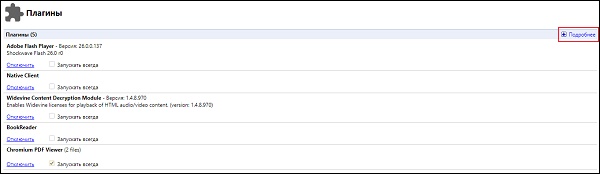
Click on the plus sign next to "Details" for complete information about the submitted plugins
Typically, a complete description of a plug-in is presented in the form of its name, version, the location of the plug-in files on the hard disk, the “Disable” button, and also the “Always run” option, next to which there is usually no check mark.
And if everything is clear with the name, version, and placement, then you need to dwell in more detail on the “Disable” and “Always Run” functions.

Modern plugins in your browser from Yandex
As you know, a plug-in (module) is a program that is embedded in the functionality of a modern browser, allowing you to significantly expand the capabilities of the latter. Plugins are often confused with add-ons (similar in functionality to programs), but unlike add-ons, plugins do not have their own interface.
Browser Plugins plugins allow you to view videos and animations on the network, listen to music, read specific adobe documents, play online games, organize 3D interaction, and perform other useful procedures.
“Gentleman's set” of a standard browser a couple of years ago included at least a dozen plug-ins, such as “Adobe Acrobat Reader”, “Microsoft Silverlight”, “Java Virtual Machine”, “”, “”, “Apple Quicktime”, “WinAmp”, “ Real Audio Player ”, various, toolbars et cetera. Over time, some plugins have lost their usefulness, some have been abandoned by many users due to their slow operation (plugins significantly slowed down the browser itself), and in some cases, developers do not want to work with some plugins due to vulnerabilities discovered (“Java” , "Adobe Flash", etc.).

Working with plugins in Yandex.Browser
Nevertheless, a modern browser (in particular, Yandex.Browser) has a number of plug-ins built into its functionality. Launching the latter implies endorsement by the user, thus avoiding the use of plug-in vulnerabilities by dishonest site developers (as happened with the same Java plug-in). If the user fully trusts any plug-in, then he can go to the plug-in settings through the already mentioned browser: // plugins command, and put a checkmark on the option “Always run” next to the required plug-in.
Also, if desired, the user can disable any plug-in, for this it is necessary to click on "Disable" in the above settings of the plug-in, and then restart the browser.

To disable the plugin, click on "Disable" next to it
Removing automatically installed virus plugins
In most cases, an ordinary user does not need to search for and install any necessary plug-in on their own. The latter finds his user himself, and this usually happens in a situation when, when trying to launch some kind of web content, the user is faced with the site’s offer to install one or another plug-in on the user's PC in order to correctly display the contents of the web resource. After that, the site usually offers the user a link, clicking on which we can download the plugin we need.
External plugins installed in this way are usually removed in a standard way, through the system tool for uninstalling programs (click on the "Start" button, in the search bar, enter appwiz.cpl, and press enter). Find the required plugin in the list of programs and delete it.

Conclusion
To access the plug-ins in your Yandex.Browser, just launch the browser, in its address bar enter the command browser: // plugins, and press enter. At the same time, I would not recommend turning on or off any plug-in without having the full knowledge of its functionality - you may violate the stability of your navigator.
In contact with
Windows 8 users: Due to system limitations, only plugins using the Pepper API, such as Flash, Native Client, and PDF Viewer in Chrome, function properly when Chrome runs as a Windows 8 program.
Installing browser plugins
If you allow sites to use plugins, and Google Chrome detects that there is no plug-in to display a specific web page, at the top of the page you will be prompted to install this plug-in.
In the message, click Install plugin. For some plugins, installation begins by downloading the file to the computer. To confirm the download of these plugins, click the "Save" button on the download panel, which will appear at the bottom of the browser window. When the download is complete, restart Google Chrome by closing all open windows to complete the installation process.
Plugin lock
Plugins are enabled by default. However, since they can sometimes be a threat, Google Chrome blocks outdated or rarely used plugins. For example, Java, RealPlayer, QuickTime, Shockwave, Windows Media Player and Adobe Reader are older than Adobe Reader X. To block all plugins, you can use the dialog box Content Settings.
Follow these steps:
- Click the Chrome menu and select Settings.
- Select Show advanced settings.
- In the "Privacy" section, click Content Settings.
- In the "Plugins" section, select one of the options below.
- Click to play. Chrome will block all plugins. However, you can click the plugin icon to launch it this time.
- Block all. Chrome will block the launch of all plugins.
To configure permissions for specific sites, click Exception management.
Running blocked plugins
- If you select an option Click to play On the page where plugins are blocked, gray fields will appear. In the center of the window, click the plugin icon to launch it this time.
- If you select the Block all plugins option, the icon of the blocked plugin will appear in the address bar, and gray fields will appear on the page where the plugin is blocked. To change plugin settings for a specific site, click the icon of the blocked plugin.
- In the menu that appears, click Always show pluginsto allow the launch of plugins on this site in the future. An exception will be added for the site.
- To start all plugins only during this visit, click Run all plugins this time. The request will appear again the next time you visit this site.
- Click Configure plugin blockingto manage browser plugin settings.
- To always allow a specific plugin to run on each site, go to the chrome: // plugins page, find this plugin and check the box Always allow.
- Deprecated plugins are blocked by default. When the browser blocks obsolete plugins, a message is displayed at the top of the page. Click Launch this time in the message to launch the deprecated plugin (not recommended).
Shutting down certain plugins
You can completely disable certain plugins. Unlike blocked plugins, disabled plugins cannot run on a specific page. When visiting a page with a blocked plugin, at the place of the plugin you will see the message "The plugin is missing."
To disable plugins, go to the plugins page: chrome: // plugins /. Find the plugin that you want to disable and click Disable. Also on this page you can enable disabled plugins again.
Another way to go to the plugins page is to click on the link. Disable individual modules in the "Plugins" section of the "Content Settings" dialog box.